Powered By Blogger
Showing posts with label Here Come the Rebels. Show all posts

Monday, August 29, 2011

Here Come the Rebels! (MMP) - "The Maryland Campaign" [Scenario #7] ~ Conclusion

Game: Here Come the Rebels! (MMP)
Series: Great Campaigns of the American Civil War
Scenario: The Maryland Campaign, Scenario #7 [Updated via the Skirmisher #2 rules]
Participants: Jim "HeavyD" D, Myself
Time: Fri, 8/17 ~ 6.30PM - 10.00PM


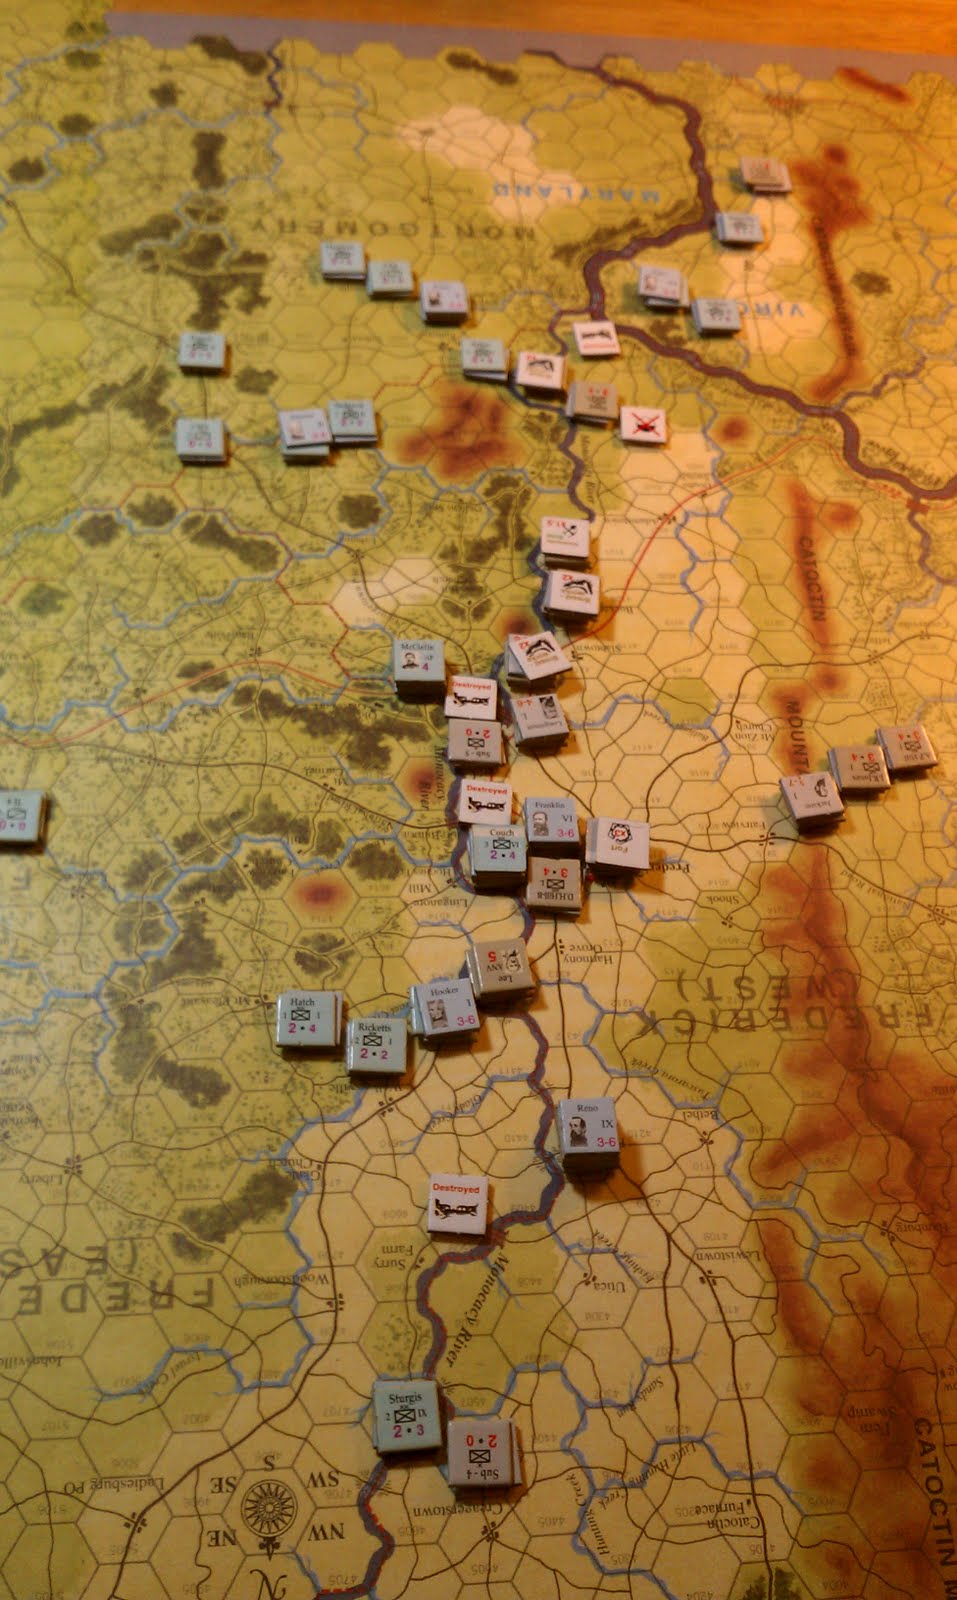
Tonight we started on turn 11, Sept 14th. I had broken the Monocacy River line. In the South HeavyD was pulling out, having rushed Jackson's two Divisions North to aid in the defense of Frederick. Hood and McClaws were on the run back towards Harpers Ferry. In the North, I was sitting next to Frederick with two Corps (I and VI) with Reno's IX a few hexes away. HeavyD had let slip that he was going to pull out of Frederick the next turn. We were very close to a Marginal Confederate Victory. I had lost an entire Union Division a couple of turns ago, this and the occupation of Frederick County (West) and the quick fall of Harpers Ferry meant that HeavyD was within sight of a Victory, albeit a slim one. 


Turn 11 - The Battle of Frederick, part 2


HeavyD might have won the first couple of action rounds, all I can remember was sitting there with my mouth watering as HeavyD had two Sub units (6SPs) in the hex next to Frederick in clear terrain and without Artillery. I had all of Franklin's Corps in the hex next to it. Slocum's Division was in no shape to take part in the fight, but Couch and Smith, the other two Divisions in the Corps were fresh and had 25SP and 7 points of Artillery between them. I have the sense that HeavyD was unaware of the risk to his units here. I jumped at the chance to attack and managed to get a +6 attack using a Corps Assault activation. I Routed HeavyD with very little cost to myself. 


Opening positions, start of turn 10

Once that happened the Confederates bugged out of the area very quickly. HeavyD was able to string together a bunch of action rounds (wining the initiative) to safely extract the rest of his units in the area. He also destroyed the RR station and the Union Depot still in the hex. He was able to make it to the Mountain line 3-5 hexes to the West of Frederick without interference. Once he was in these mountain hexes I had little interest in attacking due to the +2 defender DRM. 

VI Corps Routes HeavyD's line
Reno was able to string together some impressive marches and was putting pressure on the Sub-4 (5 SP) unit in front of him. Mansfield finally was able to get the XII Corps into proximity with the rest of the Army. The 12th wins the award for the slowest Corp for the Campaign. They though did have the honor of being the first Union troops to enter (liberate) Frederick after about a week of Confederate occupation. Hooker's I Corps took right off after Jackson following him very closely into the mountain passes. 


As the Confederates flee, Mansfield's XII Corps Liberates Frederick


Reno makes great progress in the North


Things went well in the South thus turn as well. XI Corps continued to pursue Hood towards Harpers Ferry, making it into the Mountain range as well. Porters V Corps couldn't keep pace with McClaw's fleeing remnants though. Sumner was able to get the II Corps into the area as well. Most of HeavyD's strength was in the North, I was only really facing DR Jones' exhausted Division in the South. HeavyD's Army was looking a lot smaller now. 


Turn 11 - The Race for Sharpsburg


Ending Positions, Turn 10


HeavyD had only one option at this point. He has to get to Sharpsburg before me and occupy the County with a clear line of Supply for a few more turns without taking big losses. If he can so this he could still get a victory. This is much easier said than done. However he has several key factors still very much in his favor. He can out march me all day, generally getting to move before I can (via the initiative roll, he wins ties). Also, he'll have a couple sets of mountains and a small river (Antietam Creek) to support his movement. I am breathing down his neck with the bulk of my forces. He also has several routed units, a few of his units are still out of supply as well. The mountain passes can also be a curse should I be able to get there before him, it would spell doom for his Invasion of Maryland. 


Reno wins the Race to Turners Gap

Again here I have to chime in on how much I love this game...it's because of turns like this. Every initiative roll is filled with drama, then the ensuing painful decision as one player wins the activation. The beauty of the system is that neither player knows what the other is thinking, I could be focused on what I see as the biggest risk (or opportunity)  to my forces and I have no idea if HeavyD is even aware of what I see. This applies in reverse as well, does he see something that I don't? Even though his forces are in flight, he can quickly turn and strike. Jackson's two divisions are still fresh and anything Jackson attacks with his +5 TAC rating can make me very nervous. I have to pursue him as closely as I can without leaving him opportunities to inflict a big Victory as those SPs I would loose really hurt when they convert into victory points. Add to this the few mountain passes that each of us are moving towards and you have a very intense turn. 


Sigel makes it to the 2nd pass

In the end is was the infamous 11th Corps that drove the final nail into the coffin. Sigel was able to out march DR Jones and get to South Mountain first. Once I was able to lay ZOC down on the entry hex to the pass (it is two hexes wide) while blocking the other one, it was over. Stuart was able to get there, but HeavyD didn't have anyone with enough strength to make a try at pushing me out of the pass. Reno was able to get to the other pass (Turners gap I believe) with a small division, so HeavyD could likely have pushed my out of it, but the odds we slim now that I was in the Mountains in front of him with the entire Army in hot pursuit. At the end of the turn HeavyD resigned. I was a little surprised as I thought that he could have forced one if not both of the passes with good combat results. But I had to agree that the maneuvering over the course of the turn further reduced his chances.


Ending Positions


So ended our second GCACW CG game. This time around we had a little more fighting, but it was still largely decided by manoeuvre rather then in a large clash of arms. I had never seen (or tried) to defend a River like HeavyD and in the end I think it was his downfall. Once that River line was broken, he was suddenly in a very bad position. I still think HeavyD doesn't recognize the offensive potential of the Army of Northern Virginia in this series. Even though he was outnumbered here his units are better (3 TAC vs. 2 TAC for the Union) and with the edge in movement and initiative this can be a lethal combination. I'm not sure one can gain an appreciation for this until one is beat up by the CSA in this game. We are planning on starting another CG here soon in the coming months. All in all, this was one of the gaming highlights of the year for me.

Monday, August 15, 2011

Here Come the Rebels! (MMP) - "The Maryland Campaign" [Scenario #7] ~ Part 3

Game: Here Come the Rebels! (MMP)
Series: Great Campaigns of the American Civil War
Scenario: The Maryland Campaign, Scenario #7 [Updated via the Skirmisher #2 rules]
Participants: Jim "HeavyD" D, Myself
Time: Fri, 8/12 ~ 6.30PM - 10.00PM


This is the third sitting for our playing of the Maryland Campaign scenario (#7) using the updated Skirmisher VC's and the most recent GCACW rules (per BATC). The first two sittings saw very little fighting, it was all maneuver and siege warfare with some destruction of Union property thrown in the mix. Tonight we got two turns in and they more then made up in the fighting department, with more to come.


Turn 8 ended with the Army of the Potomac approaching the Monocacy River. I had sent two Corps North in the hopes of crossing further upstream, but HeavyD was able to stay in front of me the whole way. He would get the actions he needed early in the turns and was able to keep creating sub units and placing them in my path. The AoP is spread out in three groups. In the North I have Hooker's I Corps and Reno's IX Corps (seven Divisions) facing elements of Longstreet's Corps spread out along the Monocacy and fortified in Frederick sitting on a Union Depot. Supply will hit on the next turn so that Union Depot is important to both of us. In my Center I have Mansfield's XII Corps along with Franklin and VI Corps and Sumner's II Corps. Here HeavyD is spread thinner, with a mix of Longstreet's Infantry and Stuart's Cavalry entrenched behind the River. In the South I have Sigel's XI Corps on the river line with Porters V Corps closing fast.

The map at the start of Turn 9


Turn 9, Crossing the Monocacy

Reno crossing the Monocacy River North of Frederick

Union Commitment opens the turn for the Random event (my 6th). I get the first action round and activate Reno's Corps. They roll very well for MP's and I have enough to get across. I can get a Division in clear terrain next to one of his divisions. The clear terrain is what I needed to make this a safe move as I have good artillery in these divisions and this is enough to keep HeavyD from making an attack before I can get more divisions across the river. Sturgis' Division goes further North to pin the Sub-4 unit down (5SP), making a flank attack be HeavyD unlikely. I then get the next activation and am able to bring the other two divisions from the IX Corps across and into Reno's hex. Now there is no way HeavyD is going to be able to get a good attack on me this turn. 


Greene's ill fated crossing South of Frederick


Next up I move Mansfield's XII towards the river. Green's division gets enough MPs to cross the river and then move a hex or two in. I elect to move him next to Stuarts dug in Cavalry Brigade in the hopes of doing a flank attack on the next activation should HeavyD decide to stay. This is a risky move because Greene is out there with his back to a couple of Longstreet's units only three hexes away. However I judge the risk worth it as if HeavyD decides to go after Greene he would uncover the river crossings in front of Hookers yet unmoved Corps. HeavyD gets the next initiative and decides to go after Greene. He rolls poorly for MPs though and can only get next to me. I then win the next initiative and am forced to try and fight my way out. I activate Greene and get a +2 attack on the Sub-5 unit and fail to dislodge him. HeavyD then attacks with the next action round (+3) and routes me (I rolled my 2nd 1 on the combat die while HeavyD rolls a 5 or 6). I take three SPs as losses and loose the rest of the division on the retreat for a total loss of 9 SPs. This is a tough loss, but one that I knew was possible and I deemed the risk worth it. Hooker and Franklin have a clear line across the river now. 


Longstreet's destruction of Greene's Division


HeavyD adjusts his line with the next couple of action rounds. I then activate Frankin's VI Corps and they roll a 6 for MPs. As the road is open to Frederick, I decide to make a lunge for it as I am thinking about the upcoming Supply phase and I want the Union Depot that is still in Frederick. HeavyD has a small detachment still in Frederick under a fort marker (2PS x3 for the fort). I get another action round and move the lead division next to Frederick while I bring up the next two adjacent to DH Hills Division. A surprising third straight action round affords me the opportunity to make a weal attack (+1) on the city. The rolls are roughly equal and I become disorganized and loose a couple more SPs while HeavyD maintains control of the hex. With this attack, the focus shifts South as HeavyD marches Jackson and two of his Divisions North to reinforce his breached river line. 


Franklin's desperate attempt at taking Frederick

I then send Sigel across the Monocacy South of the Potomac. When Jackson pulled out all that was left was Munford's Cavalry Brigade. HeavyD tries to slow me down here with a Cavalry retreat but I am easily across with an open road across the Potomac. Porter continues to close from the East. The turn comes to an end at this point and we then check Supply for all of our units. Nearly my entire Army is out of supply except for Porter's Corps as they were across the county line and thus in supply. While this is bad, my forage rolls the the counties that we are in are all 6's so I should easily be able to get back into supply with most of my units. HeavyD is in the same position with the exception of DH Hill and the detachment in and adjacent to Frederick. He will have to roll 4 or less adding fatigue to that in the upcoming recovery phase, a much harder thing then what I am facing. 

Sigel's Crossing south of the Potomac

Turn10, Battle at Frederick

Positions at the start of turn 10

Turn 10 opens with both Army's spread out along the Monocacy and out of Supply. I have forced him back off the River line near Frederick and in the south. I am down a Division but feel like I am starting the get the upper hand. HeavyD is still about 20VPs short of a marginal victory but with the SP losses that number is much closer. I have to break his lock on Frederick County and inflict some losses the offset those I have taken. 


Slocum's Division defeats Longstreet's two Division attack out of Frederick

HeavyD starts off by bringing Jackson and the rest of Longstreet's troops north of Frederick into and around the City. Hooker then follows and we have six Union Divisions next in three hexes next to Frederick. HeavyD takes two of Longstreet's divisions and attacks Slocum's disorganized division with a +3 attack. Slocum stands firm and sends Longstreet back into the city with a couple of losses (I roll very well and HeavyD doesn't for a change). I take the next activation to bring in the other two divisions from Franklin's Corps to reinforce Slocum. HeavyD looks at attacking Hooker's two divisions adjacent but decides against it given the beating that he just took at the hands of Slocum's tough division. I leave Hooker in place so as to get back into supply in the recovery phase (and to start digging entrenchments). The lone Sub unit North of Frederick heads for the hills, not wanting to get surrounded and eliminated by Reno. Reno elects to stay put as well to forage instead of running after the unit. 

Porter's V Corps Routes McClaw's in the South
Now the focus turns South where HeavyD is spread thin. Hood (with a very small force 2-3SP) rushes over to the Potomac forge in front of Sigel's XI Corps while Porter comes in with the supplied V Corps. McClaw's is alone to face a two division attack from the Porter's strong (and supplied) Corps. The attack comes in at a +3 and I again roll well and HeavyD rolls poorly, McClaw's is routed and looses several SP's. This forces HeavyD to break off with Hoods Division as he is now at risk of getting trapped between the V and XI Corps. I don't pursue instead electing to stay put to ensure that I get back into supply. The turn ends soon there after when each of us again roll 1's for activation and a subsequent 2. This is the 3rd or 4th time this has happened so far in only 10 turns of play. Sumner's II Corps gets stuck not having moved, but I am happy as the rest of my units have moved about as much as I wanted them to. 

The two Forces gather around Frederick
Union force composition around Frederick
 
We then spend a long recovery phase rolling for nearly all of our units to forage and get back into supply. HeavyD finds out the hard way that units at Fatigue 3 or more cannot forage. Nearly all of my divisions get back into supply. Perhaps half of HeavyD's units are either at F3 or more or fail their forage rolls. They then go disorganized at the end of the recovery phase. 


At the end of Turn 9 I was down having lost Greene's division in a failed bid to get Stuart. By the end of turn 10 I can barely remember this as I have HeavyD on the run in the South and three fresh Corps ready to head up to Frederick and cause trouble for the rest of the Army of Northern Virginia. Victory Point-wise we are still very close. If I can stop his control of Frederick County in the next couple of turns and inflict more losses then I take I think I can get a win out of the situation. HeavyD will be forced to fight to maintain control of the county, if he runs now he has little hope of retaking a different county. His pipeline of VPs for county control will have dried up. 


End of turn 10 in the South

Tonight's session has really highlighted for me the brilliance of this design. Both of us, in these two turns experienced highs and lows, now we are left with making the tough operational decisions. Does HeavyD pull out of Frederick and try and fight me before I can bring my two wings together? Should he stay put and dig in? Part of the excitement for me here is not knowing what HeavyD is thinking. Thus I could be thinking he's going to be doing one thing while he is thinking on doing something completely different. This coupled with the random initiative rolls make for some of the most intense gaming I've ever experienced. This Campaign is also unusual in my experience because of the closeness of the two Armies. Many of the CG's I've played over the years have looked nothing like an actual ACW campaign in that the fighting is generally spread out, you nearly never see bunched up Armies like you saw in the real war. Here we have the potential for some really heavy fighting around Frederick that will decide the balance of the scenario.


End of turn 10
Links to the previous two sessions:


Part 1
http://yockbosboardgames.blogspot.com/2011/07/here-come-rebels-mmp-maryland-campaign.html


Part 2
http://yockbosboardgames.blogspot.com/2011/08/here-come-rebels-mmp-maryland-campaign.html


Saturday, August 6, 2011

Here Come the Rebels! (MMP) - "The Maryland Campaign" [Scenario #7] ~ Part 2

Game: Here Come the Rebels! (MMP)
Series: Great Campaigns of the American Civil War
Scenario: The Maryland Campaign, Scenario #7 [Updated via the Skirmisher #2 rules]
Participants: Jim "HeavyD" D, Myself
Time: Fri, 8/5 ~ 6.30PM - 9.00PM


HeavyD and I picked up on turn 6 (Sept 9th) for this evenings session of HCR. HeavyD had just laid siege to Harpers Ferry the prior turn while Longstreet's Corps was running around Frederick County destroying bridges and rail road stations. Rain had also slowed my advance down to 3-4 hexes per Corps on the prior turn. With most of Jackson's Corps involved in besieging Harpers Ferry, I have hope of catching elements of Longstreet's Corps spread out and in some cases still out of supply.


The night opens with Union Commitment (the third thus far) for the random event. We jump right into the action rounds forgetting to roll on the Harpers Ferry surrender table. We do this around the third action and HeavyD rolls an eleven, the garrison surrenders. Neither one of us was expecting this. With this event, all of the garrison forces, 16SP are removed from the map and VPs are awarded for their loss (+16VP), also HeavyD can destroy the Depot for another 10VP which he does this turn. 


Jackson starts heading East as HeavyD decides to make a stand on the Monocacy River with Longstreet's Corp. At the start of the turn most of my Infantry divisions are 8-12 hexes from this line. The turn plays our quickly with HeavyD winning nearly all of the early action rounds, thus he's able to position his units behind the bridges and fords well in advance of any of my units even getting close to the scene. He also starts to destroy bridges across the River. Soon he is passing and I am now able to move the bulk of my units. 

Start of Turn 7

Turn 7 opens with Jackson bringing two of his divisions over along the Potomac leaving AP Hill back in Harpers Ferry. Longstreet's Corps is slowly getting into position behind the Monocacy. HeavyD has a few divisions that are still out of supply as well. The turn goes fairly quickly and is again very much HeavyD getting most of the early activations and leisurely getting in position largely before I have moved. Eventually he starts passing and I move the bulk of my Army closer to the Monocacy River line. Interestingly we roll for early end the turn three times, with the turn ending on the third check (if we both roll 1's on our action round roll, one player rolls a 2nd d6, if this comes up a 1 or 2 the turn ends right there). 


Start of turn 8


Turn 8 opens with a small chance for me. If I can string 2-3 action rounds together in a row and then get good march rolls, I feel like I can cross in front of HeavyD's units north of Frederick. I have Reno and Hookers Corps up North and they have been marching very well. The rest of my army is grouped up in the center with Sigel's 11th Corp in the South along with Sykes division from the 5th Corps. HeavyD has been busy burning bridges and breaking off units to man all the crossing sites. 


Reno and Hooker's failed bid to cross the Monocacy River


We start off and HeavyD gets the first few action rounds, which has been the theme for this evening. He is able to break off another unit and cover all the good sites. The fords that he leaves open are usually open ground adjacent to a large one of his division, not a good idea for me to try a crossing in those conditions. I finally get a couple of activations and Reno rolls average for MPs, thus he's not going to try and make an attempt at crossing. Hooker gets the next action round and he rolls well, catching up with Reno's Corps. Then we both roll 1's for initiative and a subsequent 1 ends the turn. Wow! 


Ending positions, Turn 8

As its getting late and the next turn will likely be a long one, we decide to call it an evening. Not a lot of excitement tonight, but the tension is mounting. I have to find away across the Monocacy (how on earth is that pronounced?) in order to push him out of the county. Soon the VP's he's getting for being there will go up. HeavyD has 54VP's at the end of this turn, just 30 short of a victory. We should be back at it next week.

Saturday, July 30, 2011

Here Come the Rebels! (MMP) - "The Maryland Campaign" [Scenario #7] ~ Part 1

Game: Here Come the Rebels! (MMP)
Series: Great Campaigns of the American Civil War
Scenario: The Maryland Campaign, Scenario #7 [Updated via the Skirmisher #2 rules]
Participants: Jim "HeavyD" D, Myself
Time: Sat, 7/30 ~ 10.30AM - 1.45PM

"Here Come the Rebels!" was released in 1993, the second game of the GCACW series. It picks up right after 2nd Manassas in September of '62 (Stonewall Jackson's Way). Lee is on the March, for lack of anything better to do. Little Mac has reorganized the Army of the Potomac, absorbing Pope's Army of Virginia. Lee is bound for Maryland looking to take the fight out of Northern Virginia into the fertile fields of Maryland.

There are two Advanced game scenario's in HCR, we are playing the 2nd one, the complete campaign (18 turns). Lee's Army of Northern Virginia is on the offensive. There are two maps, the Eastern one has Baltimore and Washington on it while the Western map has Frederick, Harpers Ferry and Sharpsburg featured. HeavyD will be entering the Western map with his entire Army on the first three turns. The Union forces start out within Washington with 5 Corps free to move, the rest (3 Corps) are released gradually via random event.

As released, the two Campaign scenarios were broken. They captured the spirit of the campaign but were imbalanced in the favor of the CSA player. Steve Sandy published a revised set of victory conditions in MMP's 2nd volume of "The Skirmisher", a journal dedicated to the GCACW series (both of these are must haves for fans of this game series). Most of the victory conditions are the same in this updated version, with the values changed yield a closer game where either player has a fair chance to win. The scenario rightly forces the Union player to eject the Army of Northern Virginia out of Maryland. The CSA player has a couple of valid paths to pursue as well. The historical one (Lee goes West into Maryland) as well as an interesting Eastern strategy (Lee marches towards Baltimore). The much higher VP reward for this Eastern option make it very interesting, despite the proximity to Washington and the very large AoP.

At Start Set Up
 The scenario requires the CSA player to get at least 84 Victory Points to win. There are two major ways to score victory points. County Control is checked once per turn and this is the primary way the CSA player will earn VPs. The Eastern Counties yield much higher VP rewards compared to the Western counties. Burning rail road stations is the second major source of Southern VPs. One of my observations with the Campaign games is that some of them, especially the early unbalanced ones tended to result in games that had the CSA player running around doing things instead of trying to defeat the Union Army. Thus you had a series of much smaller battles that were spread out. I have rarely scene a Campaign scenario result in a large 1-2 day battle involving nearly the entire Armies of both sides. I will say that these rebalanced efforts have done the right things to correct this problem. I can recall several recent CG's (RTG & GTC) resulting in large scale game winning or loosing battles (at least in my experience). So I am very hopeful that this will come to pass in this game as well.

The entry point for HeavyD, with the Army of the Potomac encamped in Washington

We decided to let HeavyD continue to play the role of Robert E Lee while I assumed control of the Union side. I have played this scenario several times with both victory conditions, but alas none recently so I am not really starting with anything of an advantage (except that I am much taller then HeavyD, so that might help). We are using the GCACW basic game rules (1.1, as of BATC).

Opening

Turn one see's only one Confederate Division able to move. HeavyD runs this Division straight at Frederick. Frederick is the county seat for Frederick West County and the Division (DH Hill, Longstreet's Corps) has 12SP which is just enough for control of the county. DH Hill's division marches 19 hexes (21.85 miles) in four activations and falls two hexes short of Frederick on the first turn.


Turn 2 opens with Union Command Paralysis, thus I will be unable to move any of my units, except those that HeavyD gets too close (8 hexes) to. Jackson's Corps also enters this turn. HeavyD sends them towards Harpers Ferry and I see that we are going to see a conventional Western approach for HeavyD and not the Baltimore gambit as I had secretly hoped for. Jackson's three divisions make good progress towards Harpers Ferry while DH Hill rests in Frederick, picking over the Union Depot there. HeavyD earns his first 2 VP's of the game for controlling Frederick West County.

  
Jackson closing in on Harpers Ferry

The Harpers Ferry Garrison
 Turn 3 starts off with Union Commitment, so I get a Division free to join the AoP (which hasn't moved an inch thus far). Longstreet's Corps enters this turn as well. HeavyD sends a couple units of it towards Harpers Ferry to enable Jackson to completely surround the forces there and start rolling on the surrender table. Longstreet and Lee take the rest of his Corp's North and East ending near the C&O Aqueduct. Jackson isn't able to surround Harpers Ferry yet. I move a Brigade from Harpers up on to the Naval Battery and start digging in there. I also start the AoP North with each of the 4 Corps averaging around 6-8 hexes on two marches. I elect to use rail movement for the 1st Corps (Hooker) and send them up towards Baltimore and then West down the B&O railway as Stuart has made his way over there and is in the midst of damaging railroad stations. DH Hill stays in Frederick resting and gaining VP's by controlling the county.

The Siege Begins

Another Union Commitment opens the forth turn, releasing another Union Division to start on the Road North. HeavyD destroys the C&O Aqueduct and continues marching Longstreet's Corps in a North Eastern direction. I am able to get some Union Cavalry in his way, slightly delaying him at the cost of one of the Regiments. Stuart falls back as the entire 1st Corps is now up from DC and is marching along the B&O Rail ling. HeavyD splits up DH Hills Division sending 5SP over to support Stuart and destroy the RR station.


Jackson is able to encircle Harpers Ferry. His units are tired and in no position to make an Assault (at least not yet), so they rest while we await the rolls on the Harpers Ferry Surrender table (right now he needs to roll a 9 or higher on two dice to cause a surrender.  I continue to march the AoP Northwest again only averaging 7-9 hexes per Corps.

Hooker's I Corps drives Stuart back along the B&O RR

Turn 5 sees Rain (Current) come up on the random events table. We also check supply at the top of the turn. Nearly all of HeavyD's units are out of supply with the exception of Stuart's Cav and DH Hill's division as they are sitting on Union Depots. This is really the perfect situation for HeavyD in relation to supply as he can afford to sit and make small adjustments to his position while he prepares to forage in the recovery phase. I am hampered by the rain and am only able to make it 2-3 hexes in his direction. Harpers Ferry holds out another turn. During recovery HeavyD rolls very well and gets most of his units back into supply, with only a few left that are not (they become disorganized as a result).

End of Turn 5 (Sept 8th)

We stopped here as we were out of time. Next session looks exciting as I am starting to get closer to Longstreet's Corps with the bulk of the AoP while Jackson is still laying siege to HF.

Wednesday, June 1, 2011

Here Come the Rebels! (MMP) - "Harpers Ferry-Crampton's Gap" [Scenario #2]

Game: Here Come the Rebels! (MMP)
Series: Great Campaigns of the American Civil War
Scenario: Harpers Ferry - Crampton's Gap
Participants: Jim "HeavyD", Myself
Time: Friday, May 27th ~ 6.30PM - 8.45PM

HeavyD is a big ACW game fan, and surprisingly has not played a lot of GCACW. Thus we are working our way through a few of the smaller scenario's in the series, teaching him the ropes. Part of this was stimulated by our recent trip to the Chickamauga Battlefield. I have all the games in the series and have played them all sans OTR. For me, GCACW is my 2nd favorite series after ASL. Previously we HeavyD and I had played a couple of the smaller one-turn scenario's from BAC. I went looking for a smaller (school night sized) multi-turn scenario from the series. I came across this one and liked it.

The scenario takes place between September 12th through the 15th, 1862. Lee's Army of Northern Virginia is on the move prior to the Battle of Antietam (Sept 17th). The CSA player (HeavyD) is try to take Harpers Ferry with all of Jackson's Corps and some of Longstreets. Jackson's Corps starts out North of Martinsburg while some of Longstreet's Corp begins NE of Harpers Ferry. Stuart has a couple of Cavalry Brigades between Harpers Ferry and the approaching Union forces.
Initial Set-up

The Union Player starts off with the garrison forces of Martinsburg and Harpers Ferry as well as Franklin's VI Corps of the Army of the Potomac. VI Corps starts a good 20 hexes away from Harpers Ferry with a couple sets of mountains between then, not to mention Stuarts two Cavalry Brigades and 5 Brigades of Longstreet's Corp. The objective for the CSA player is to take Harpers Ferry and Martinsburg and then position divisions and brigades in or next to Sharpsburg which is a few hexes NW of Harpers Ferry. All of the CSA units begin the game at Fatigue level 1.This scenario has been "fixed" and we are using the new version (it, and other errata is located at gcacw.com as well as CSW).

End of Turn one, near Martinsburg

End of Turn one, near Harpers Ferry

The first turn saw HeavyD take Jackson's Corps to next to Martinsburg, rolling poorly in the process. Thus the entire Corps was at F3 at the end of the turn. I ran that Garrison unit out of there as there was no sense in allowing HeavyD the VP's he would get but destroying the unit. HeavyD then moved Longstreet's Brigades towards the Naval Battery (NE side of Harpers Ferry). I pulled one Brigade out of HF and parked it on the other side of the bridge in case HeavyD was able to push out the one Infantry Brigade I had on that side of the River. I marched Franklin's Corps twice, rolling well each time. HeavyD then moved Stuart down in my path setting up a blocking action in front of me.

Turn two started off with me activating Franklin's Corp and rolling well. Stuart did a Cavalry retreat and due to the retreat table had to fall back towards HF. This would prove disastrous as I got the next activation and again marched Franklin's Corps towards HF. Stuart was again in my path and this time the Cavalry retreat forced him to retreat through my units near HF, eliminating the Brigade in the process. This caught me by surprise as I didn't think the retreat chart was as harsh as this to cavalry doing a cav retreat, but it is (the first 4 hexes HAVE to be further away from the unit causing the retreat. With Stuart out of the way I continued towards HF. I moved next to Semmes Brigade and got a +4 attack, again the retreating Brigade had to move through other Union units thus destroying itself as well.

Franklin's attack on Semmes' Brigade

Now the road to HF was open and HeavyD had few options left. He elected to launch an attack on Ford's Brigade in hex 2720 to try and at least throw a ZOC in Franklin's lead Division. The attack went in as a straight up affair and he was unable to force me to retreat. This was the death knell as I would be able to get Franklin's Corps next to the Bridge on my next activation. Jackson had yet to move and thus was still 15-20 hexes away from HF. We decided to call it at this point.

McLaws Attack on Ford's entrenched Brigade

I really diced HeavyD in this one. But on the bright side we certainly have a very good understanding of the retreat table and its implications in tight quarters. We plan on playing one more small scenario before we plunge into a Campaign Game.