Powered By Blogger

Wednesday, March 16, 2011

Ukraine '43 (GMT) ~ "Campaign Game" Part 2

Game: Ukraine '43 (GMT)
Scenario: Campaign Game
Participants: Bob H, Myself
Time: Sunday, Mar 13th ~ 2.30PM - 5.00PM


The weather in St Louis decided to remind us that Winter still had one or two more swings left this past Sunday as Bob and I returned to U43. As I sat down to do my turn prior to Bob getting here I found that I wasn't entirely unhappy with how the first couple of turns had went. Bobs dice had been very bad throughout the entire first two turns and he had taken twice as many losses as I had. One thing that we had blown was that I failed to reduce 4 mechanized steps prior to play (this represents the Kursk losses yet made good). So as I took these now I found that there was a small up side, it took a couple of my Panzer Corps from 4 steps to three, thus getting me back on the magnitude 1 column. To date my Panzer Corps had not done much except plug lines and get in Bobs way when he tried to widen a hole in the exploitation phase.


Northern Shoulder, start of Turn 3
The Southern Front, start of Turn 3

Turn 3

Bob moved Zhukov in NE of Stalino to try and compress the bulge in his line. I had kept a corridor open here with heavy reinforcements and two of my three Panzer Corps. I wanted to make him pay the price in attacking the fortified line for as long as possible. The Donets River was also aiding me in this effort as it slowed Bobs reinforcement North of the little Bulge. Sure enough in his opening attack in this region he paid a heavy price for the hex, loosing four steps to my two.

Zhukov Opens the Turn in the South

Bob also had several attacks NE of Kharkov. These either bled my line units or forced them back off this initial line. This also triggered my pulling back the three Infantry Divisions holding the tri-angled River line directly East of Kharkov, somewhat shortening my line. Bob also made several attacks near Sumi. This sector was getting interesting as he was able to get the 5TK back into supply and in turn put my 327ID out of supply. Sumi fell yielding a VP to Bob, but the line North of Sumi sustained an attack and I was able to get some fortifications built.
Turn 3 Russian Attacks Around Kharkov
Bob's Comments:

I continue my attacks with Zhukov in the south.  Steve has sent reinforcements to this area which is fine with me as that means less in the more important area around Kharkov to the North. I take heavy casualties but steadily grind away.  To the North East of Kharkov I force Steve back and move ever closer to the City.  Because of the poor results last turn I am unable to exploit my success West of Kharkov.  A lucky die roll at Sumi results in its fall giving me needed VP's.  Steve is not voluntarily giving up any fortified zone hexes making attacks very bloody.


Turn 4

With the fall of Sumi in the North I am now hard pressed to keep my line intact. Bob is able to push me out of Byelopoly, the site of some German heroics on turn 2. Bob is unable to eliminate the surrounded 327th though. Bob pushes out and I see my first chance to hit back in my turn. I attack with the 48Pz and force a reduced Russian Infantry Corps to flee. The 327 starts its breakout and in my subsequent combat phase I widen the hole in Bobs line. The Luftwaffe comes to the aid of the 327th and I am able to get them back in supply, avoiding an isolation roll and setting back Bobs offensive tempo in this sector of the front (I think at least).

The situation at the start of German Turn 4
Counter-Attack; the 48Pz opens the line allowing the 327th ID to escape
Meanwhile near Stalino we have some serious drama. Bob tries to cut off the remaining two Infantry Divisions in the Donets Bulge with a concerted attack on the 3rd PD. The attack fails and the 3rd is able to erect fortifications. Had this attack succeeded I would have been in trouble here, having two ID's cut off.

3rd PD keeps the pocket open under intense pressure
Bob's Comments:

Steve's counter attack around Sumi is effective and he is able to get the 327th Inf out of danger.  In the South I attempt to isolate two German infantry divisions with an attack on the 3rd Panzer, the dice fail me again.  Had this been successful I think things in the South would have opened up quite a bit.


Turn 5

Things finally start to loosen up for Bob in the North. My line North of Kharkov starts to fail and Bob makes some good progress here. I rush the GD in to help hold this key city. Bob is able to extract his revenge on the 327th ID, eliminating it in his primary combat phase

Turn 5 Russian Attacks
Kharkov Sector at the end of Russian Turn 5
Bob has completely kicked my off the starting line from Kharkov all the way North. Thus sector of the front is very fluid now. I do have some strong units in and around Kharkov at least.

Meanwhile in the South, the reduction of the Donets Pocket continues. I am able to pull the 46th and 333rd IDs back through the gap held open by the 3rd PD. Here it feels like I am hanging on by my fingernails.

The Donets Pocket being reduced
Bobs has caught up in the casualty department, currently he's lost 45 steps to my 27. I have lost then 17 steps in the last three turns, up dramatically over the first two turns where I had only lost 10 steps. The dice were fairly even this time around as well. Bob is clear of the line in the North and will soon be clear of it in parts of the South. He's given up on the extreme Southern front, moving the few mechanized units there up North where he's broken my line. We get together tomorrow night to continue.

Bob's Comments:


North of Kharkov I make some nice progress and send the Germans back toward the City.  I also make progress North West of Kharkov and feel that I am very close to a breakthrough.  In the Donets region i continue to close the bulge but my lack of success last turn will make any breakthrough difficult.  In the German phase Steve has sent some powerful units to the Kharkov area signaling that he will not give up the City without a hard fight.

Tuesday, March 15, 2011

Advanced Squad Leader (MMP) ~ "The Sooner the Better" [J91]

Game: ASL
Scenario: The Sooner the Better [J91]
Participants: Joe "YJ" C, Myself
Time: Saturday, Mar 12th ~ 1.00PM - 6.00PM

YJ's weekends have been hijacked for the next 6 weeks or so. Thus we had this one Saturday to play some ASL before he goes into non-weekend mode for a month and a half. Our plan was to start the Kursk mini-CG, but I decided to put that on hold until he had some space on weekends. With the release of the map pack, I wanted to get back to the desert, so I started looking at some of the recent desert scenario's released in the past few Journals. Some of the first ones I found, while about the right size suffered from imbalanced ROAR scores, then in Journal 6 I found this gem. It is nearly even on ROAR and surprisingly light on desert SSR's and terrain thus making it a bit easier on YJ as this will be his first desert scenario.

I have always liked desert scenarios. I've played nearly all of them (those being released prior to the last ten years or so) at least once, some several times. Thus it only took a bit of a rules refresh to bring me up to speed. Prior to the scenario I took YJ through the main differences in desert scenarios (rout exceptions primarily) as well as the two terrain types (hamada and scrub) and their effects in this scenario. Also, as the scenario takes place in April '41 the Germans are treated as having red MP's.

After set up
Our scenario finds the Germans trying to take Tobruk in the spring of 1941. The scenario opens the morning after the Australians let the 8th MG battalion and roughly a battalion from the 5th armored regiment drive into their lines, only to fine themselves (the Germans) surrounded and out gunned the next morning. Thus the Germans are trying the exit the ring of fortified locations surrounding Tobruk. The Commonwealth forces have to score 40 more DVPs then the Germans to win. German units are able to exit off the South edge of board 28 and not be counted as losses.  The German infantry sets up in the open in some abandoned sangars with the German armor entering the North edge of the board on turn one. The Australians have two strong points in the path of the fleeing Afrika Corps units. The German armor (2 Pz IVE's, 6 Pz IIIG's and 6 Pz IIIH's) is being chased by a glorious force of six Matilda II's and some A13 support tanks. There are also two pursuing groups of Infantry that enter the board, one of these containing two 2pdr Portee's (40L ATG's mounted on the backs of lorries). The Australian strong points are lacking in AT weapons sans a couple of ATRs and one module of 80MM OBA. There is light dust (+1d6 *.5 FRD) which allows vehicle dust. Other then that there are no other special rules of note.

Prior to the start of Turn 1

We rolled for sides and I got the Germans. I had no idea what to expect. I had spent all of my pre-game sauce focusing on re-reading the desert rules, making sure I knew how the Portee's worked again and setting everything up. Thus when I sat down to roll the first WCDR was the first real chance I had to focus on the VC's, this is usually a sure sign that I am in trouble. When I did start thinking about the VC's the first thing that jumped out at me was that I was not going to kill any Matilda's; they have 11 frontal armor and 8 on the side/rear. Most of my tanks are sporting 50's (TK# 11) so my odds in a tank on tank fight are nonexistent. Also his lovely Matilda's are slow, with an MA of 9 while my tanks are going 13. I also knew that if I drove off all of my armor without loosing any, there weren't 40 DVP's worth of German Infantry remaining on the map.

Turn 1: Oh what a sight!

The German Armor Arrives
I entered my armor in a big group, trying to cover every ones rear end in vehicle dust. I elected to keep them together as at this time my thinking was that I would use them to cover my infantry's advance on one of the strong points. I also elected to keep them in motion making it harder for YJ to get hits. I immediatly didn't like how I set up my un-possessed guns. I should have spread them out between my infantry and my armor instead of on the side of my Infantry's starting location (they must set up un-possessed and > 2 hexes from any German MMC). Also it occurred to me that even should I man them I am going to have a hard time hitting anything at the range they were from any enemy units considering the light dust (from +1 to +3 LV on each shot) and that I was unqualified to use them (as I had no crews). In the end I chose to man them as the gun shield would at least give me some shelter and it would make is harder for YJ to take them out should he decide to do that.

YJ entered the Matilda's and stopped; acquiring six of my tanks in his advance fire phase. One of his MMG's went on a tear and broke my HMG and one of the MMG squads. But more importantly, he was not able to make radio contact at all (my turn or his). I was deathly afraid of that OBA and quite relieved when he didn't make contact.

End of Turn 1

Turn 2: The flight continues...

I decide to break off two tanks to interdict his reinforcement group with the Portee's. This I regret as soon as his turn begins as its getting clearer that should I get all my tanks off (unlikely as that is) I can get a win. With the radio not bringing any OBA down on turn one this now seems like my best plan. As it turns out, the two tanks did draw his attention, but I put them too close and he's able to rush them with his infantry, slipping the Portee's by unharmed. We also realized that YJ forgot to enter his turn one infantry, which we bring on this turn.
Interdiction

I decide to park the two Pz IV's and set up the SMOKE shot for turn three, the rest of my armor I keep in motion covered in dust, sans the two unfortunate tanks that I send off to interdict the Portee's. None of my infantry rallies as YJ is keeping them DM with his MMG's in the strong points.

Wild Aussie's

On YJ's turn, he again elects to shoot the Matilda's instead of moving them up. He breaks his second MA and takes out one the my tanks near his infantry. My remaining tank has its hands full as YJ charges it with all of his infantry from that group. The Portee's drive past the tanks and head for one of the strong points. The radio comes to life and an ominous SR lands several hundred yards from my formation. The late arriving Infantry force makes a bee-line straight at a couple of my trailing tanks trying to take them out in CC (and failing).

End of Turn 2


I am upbeat at the end of the turn as my armor is at least now in striking range of the strong points and I have not lost any of my main force of tanks aside from the two I foolishly broke off the slow his infantry down. I am starting to think that YJ has made a grave error in stopping the Matilda's as the farther I get from him the harder its getting to get good TH numbers as he is shooting 40L's at 15-20+ hexes and that range will continue to widen on the next turn.

Turn 3: The pipe breaks...

Finally I am able to shot back! My sole remaining Interdicting tank survives CC immobile, occupying two or three of YJ's squads in Melee. The other falls to Matilda fire. I manage to SMOKE the MMG in the pillbox and rush a couple of tanks near this strong point, I send three tanks at the other SP, where the radio is. The Portee's shot at and miss these moves and so I decide to run a tank over there to chew them up. One of my guns breaks as my Infantry try to use it without success.

Overrun!

YJ's other group of infantry fail to harm me in CC and these tanks turn and gleefully overrun these units. There are not many occasions in my ASL career where I can recall doing three overrun attacks in one turn, much less two of them with one tank. YJ's stout Aussie's hold up well though with only one of the stacks breaking. But the other three squads in this area are in mortal danger as I am now parked close to him and will be able to machine gun him on his upcoming turn.

However, the back breaker for YJ was his radio breaking in his Defensive fire phase. This radio was really his only remaining AT deterrent on this side of the map at this point. We both now see that keeping the Matilda's stationary for the first two turns was a critical mistake. At the ranges my armor is at now I am nearly impossible to hit given the his small gun size, vehicle dust and finally the light dust. When the radio broke, so did YJ's personal morale. Coincidentally, a pipe in the basement also broke around this time so we were distracted for a while dealing with running water!
End of German Movement, turn 3

I am not entirely sure the scenario was lost when the radio broke, but I knew that if I were in his shoes I would have given thought to throwing in the towel as he did. I was in position to start tearing up the near strong point with close range tank fire, allowing my Infantry to emerge from their holes and start making for the strong point. The two Portee's were also in danger. I would likely get one in advancing fire and most likely take the 2nd one out in the following turn (granted he would have likely taken out a tank or two in his prep). The real issue though was that it was starting to look very difficult at this point for YJ to get near the +40 DVP differential that he needed. I was close to him now and was going to start taking out his infantry, he had nothing on this side of the map to threaten my armor. The Matilda's were at least two turns, but more likely three turns away given their slow speed. By then the scenario would be over.

I can see why this one is even on ROAR. I would happily play either side again. The trick is that the British need to keep the Matilda's moving, forcing the German armor to either flee or stop and help the infantry, exposing themselves to the oncoming Matilda's. I certainly made my share of mistakes as well.

This is really an interesting scenario, like most of the desert scenarios I have played. I hope to take YJ back to some of those old desert classics from the original British module in the coming months, but the arrival today of the latest Journal and Action Pack are going to be big distractions.

Monday, March 14, 2011

PQ-17 (GMT) ~ "XIII. PQ-9/10: Before the Storm "

Game: PQ-17
Scenario: "XIII. PQ-9/10: Before the Storm"
Participants: Jim "HeavyD" D, Myself
Time: Friday, Mar 11th ~ 6.30PM - 9.30PM

Tonight, HeavyD and I sat down to play our second game of PQ-17. We had played it about a month ago, the first time that either of us had played this game. We played one of the scenario's published in C3i called "PQ-9/10: Before the Storm". This is a smaller scenario that the designer has used to teach the game at events. It depicts the peaceful passage of a convoy to Murmansk in February 1942. Historically the Germans did not attack the convoy. The scenario has daylight turns and night turns (one each day) thus allowing the German and Allied players the chance to do air operations. This is defiantly the right choice for people learning the system to be their second scenario.

I enjoyed our playing of the last scenario. As mentioned it was the first time we played this game and we were both busy figuring out the mechanics of the game. I was the German player in that scenario and once I got the mechanics of the searching down, it went very quickly. Essentially I would move, search and then if I had a convoy/task group spotted and U-boats in position (they cannot move and attack in the same turn) I would attempt to make an attack. This would require another search (a card draw) and then we'd roll on a couple of charts to get the results. The subs could sometimes attack first, other times the escorts are able to attack first and perhaps thwart the subs attack all depending on the situation (represented by modifiers). I might have gotten one or two hits that night and I don't recall any destroyed U-boats. As the scenario took place during near total darkness the Luftwaffe was not a factor aside from the abstracted search units (the game abstracts air search nicely using various zones for this).

The game after set up
One thing HeavyD and I both did since our last playing was to re-read the whole rulebook. I had only skimmed the surface combat section last time as I knew that there was no chance of having a surface engagement. I also paid close attention to air combat mechanics as in this scenario air units represent my main force, aside from 5 or so U-Boats and a small chance that the Tirpitz would make an appearance via random event. Based on HeavyD's reaction, I was expecting the surface rules to be much more complicated then they actually were. Essentially each player places his units on a battle board in various lanes and shots, then if the engagement continues, some units can move within these lanes and you have another round of combat. A pretty nice method and again heavily influenced by modifies and various other things. The Germans were skittish of loosing their few remaining heavy surface assets in this phase of the war and as such there are many conditions that have to be met to allow the Germans to fight a pitched battle. Thus most of the time the German players main threat comes from the air and underneath the waves.

This scenario, specifically designed to bring players into the game starts after the "pre-game" stuff has taken place. This means that you skip a phase where the Allied player will plot his movement (he still does in this scenario) and then move for 3-4 turns rolling only for weather and other random events. The purpose here is to help speed through the phase where the Allies are queuing up and leaving port...all this makes sense and I'm glad the designer chose to approach it this way in lieu of opening each game with 3-4 really boring turns. This scenario only has one convoy en route to the USSR and no returning convoy heading the other way, which you will have in most of your PQ-17 scenarios (or campaign games for that matter).
PQ-9 Moves North
Thus we are starting with a very scripted situation with little room for the players to make any major decisions. I am speaking mostly about the German side, I really only had 4 subs at sea and 4-5 air units at my disposal for most of the game. I did have a few destroyers in port that I could have sailed with, but the Allied player starts with an overwhelming escort force, including two BB's (KGV & Duke of York) and one CV (Victorious) as well as several heavy and light cruisers and a half dozen DD's plus other escorts. Both sides know where the convoy starts and where its going, so the dummy blocks don't add much fog of war. The Allied player has a couple more decisions to deal with but these are also fairly marginal and don't seem to add very much tension or excitement to the scenario (for instance when to turn the heavy escorts around to return to Iceland and turn over the protection to the Russian based escorts).

Sadly, I lost interest almost immediately. I never felt engaged by the game. I didn't feel like any of the decisions I made had much of an impact on the outcome. It seems like its all very scripted and that the player is really just lining it up and watching the show. Sort of like those old "electric football" games that those of us of a certain age will remember. You set up your stuff, move it where its supposed to go and see what happens. I had little interest in what happened. The book I am reading about the Arctic Campaign was much more engaging then the game, and all I have to do is read the book (and use my imagination of course)! HeavyD seemed to come alight at the thought of the Tirpitz sailing (I actually rolled the random event to trigger this) but by then I just wanted it to be over. We got through around ten turns without either side making an attack. I started to play Angry Birds on my phone after awhile it got that bad. When the Convoy was a couple of turns away from making port we stopped as he'd sailed past my U-boats and we knew they would not likely be able to get into position to make an attack.

Convoy sighted
Thus this will be the last time I have PQ-17 on the table. I had similar reactions to "Downtown" and "The Burning Blue". I think very highly of both of those games and what they accomplish through their enlightening treatment of their subjects (Downtown is the air war over North Vietnam, Burning Blue is the Battle of Britain) but as games they didn't hold my attention once I had the systems down. Its very much the same with PQ-17. I admire the design and am very glad that HeavyD and I played it a couple times, but in the end there isn't much here to make me want to come back and play the game over and over again. I want to at least think that I as a player have something to add to the experience. I felt none of that here.

Now, I know that the designer is working on other historical situations for this system. I can see this system being highly effective say for example covering the Guadalcanal campaign or some of the campaigns in the Med in the early war. Guadalcanal especially seems like it would be perfect for this system and I would be first in line to P500 that title. I am happy that I spent the time I did with the game though. As mentioned I bought and am reading several books on the campaign and these are quite good. I'm also glad I spent the time learning the game as it does a great job of getting you into the situation, making you aware of the challenges both sides faced during the campaign. This for me is one of the big reasons I game, to get this context around the history that I am so taken with. PQ-17 certainly does that in spades. So I hope that Mr. Janiec is hard at work on volume two of this series as I'll be back for it.

Tuesday, March 8, 2011

Ukraine '43 (GMT) ~ "Campaign Game" Part 1

Game: Ukraine '43 (GMT)
Scenario: Campaign Game
Participants: Bob H, Myself
Time: Sunday, Mar 6th ~ 2.30PM - 5.30PM

After our diversion to the American Revolution, Bob and I are re-starting U43. Two or three years ago Bob and I played this game a couple of times, when we were just starting to warm up to Simonich designed games. After playing all of his recent releases and liking them, we decided to try U43 in lieu of EFS. We are thus far getting mixed signals on the EFS series and so decided to wait on it, instead going for a proven winner in U43. Additionally I want to 'test' my attention span, that is to say, can I stay with a game that will likely take 15-20 hours to complete.

Recently Bob and I played scenario #4 (Crisis on the Dnieper) which I wrote about. We didn't finish that game as it was increasingly turning into a rout. Right after we stopped that game, both of us re-read the rules. We were surprised to find that we had gakked several minor rules and one huge rule. First the small ones:

  • 9.10, Soviet attacks that role a '6' on the primary die roll have that re-rolled 
  • 23.2, Air, artillery and high magnitude attacks can only take place w/in 7 hexes of a HQ
  • 23.3 German Pz Corps get +2 on Defense (which we might have missed)
These are some pretty small rules to miss, but they certainly will have an effect on the game, primarily once the Russians break the river line, they are going to be more tethered to HQ's then what we experienced in our warm-up game.  The MAJOR rule that we missed was that for battle magnitude (8.4) where we were combining the number of steps involved instead of taking the single lowest number. This of course made a huge difference in that nearly every attack the Russians made was a magnitude 2 at least.

The Northern Shoulder, after Set Up
Set Up


We used the free set up as I had forgotten that the historical one was on the back of one of the cards, instead of in the rulebook which was where I looked. I think all our previous CG's were played using the historical set ups. Thus I was a little surprised by Bob's set up and where he decided to make his two main offensives. However I am also very interested to see where this leads as he obviously made his set up decisions based on my set up. The Russians set up all of their non-mechanized units first, then the Germans set up their whole order of battle, THEN the Russian player sits down and sets up his mech units as well as his artillery and other support units.
The Center, after Set Up

The Southern Front, after Set Up
Bob's Comments:
I really like U43 and have always had a good time with it so it was great to try the campaign after we both have a firm grip on the rules.  My strategy will be to attack were the strong Panzer Divisions are not in the hopes of establishing a firm bridgehead across the German fortified line for a push to the Dnieper.  It is also my hope to draw some of the larger formations away from Kharkov as it has to be taken because all the major rail lines on the northern portion of the board go through there and without rail lines my mech spearheads will stall out.


Turn 1: Opening Blows

Bob surprised me a bit in his choice of the Northern Sector of the Front as one of his main sites for his Offensive. This area is lightly held and without an motorized reserve for the Germans, however it sits next to the top of the map and thus is a bit easier for me to maintain a line. Also, its not an area that is rich in VP hexes and its easy for me to move my reinforcements into the line on the turn of entry without having to use rail movement, which disrupts them (if they used rail movement).

Bob did manage to do well in a couple of these attacks and broke my line. He was able to advance into a ZOC bond and this caused me some problems, eventually leading to my decision to pull back rather quickly in this area. A surprisingly strong resistance by the Hungarian 1st Division bought me some valuable time while costing Bob three steps to my two heroic Hungarian steps.

The Northern Shoulder, after the first Russian combat phase
Bobs attacks with the Voronezh Front also lead to a break out. Here though Bob got the first of several AR results as the 167ID fought off the initial Russian attempts and displacing them. Manstien was also available to un-disrupt the 57ID and push them back into the line, reinforce them and thus cut off the 5TK. This frontage was where Zhukov lead the historical attacks that lead the Kharkov falling.

Manstien helps cut off the 5TK while the 167th holds the line (end Russian 1st turn)

Bob's dice got colder the further South he went in his opening combat phase. But he did manage a couple of nice attacks alone the Northern Donets River and Marshal Zhukov was able to convince the units in his area to advance. Bob is firmly across the Donets in this section and is making progress in the rough terrain. The price has been steep though and I have most of my armored units in this area.

Progress in the South, end of Russian turn 1
Bob's Comments:

I decided to attack on the north edge of the map because it appeared it was lightly held and Steve made a mistake in his initial set up letting me slip around one of his divisions.  I really did not have much hope of a wide open breakthrough in the area because it so close to the map edge and there really was not much there.  I just wanted to get across the fortified line and force his left flank out into the open area.  I was successful in getting across the line and would have made more progress if not for the  1st Hungarian Division with stopped me cold in the breakthrough segment.
 
West of Kharkov the 5th TK Army broke through the defensive line giving me a nice foothold in that area.  Further South on the Donets Front not much progress was made but Zhukov with the Shock Army got across the difficult terrain and defensive line.  Steve had strong Panzer reserves in the area so I knew I would not get far but it was my hope to keep them in the area not further North.  A note on my use of Zhukov in the South on the Donets.  My thought was that because of the increased attrition associated with his use it would be to my advantage to use him with infantry attacks and not with the armor around Kharkov to preserve my mechanized forces.  In hindsight I was wrong.


Turn 2: Adjustment

During my first turn I am able to get a couple of panzer divisions started in the direction of Kharkov, but I hold the 3PZ and 2SS corps in the South to help me deal with the Russians advances in this area. I am able to keep several divisions in position on the Donets (and thus in their fortifications) by moving the Pz Corps in the help hold the supply lines open. Also, Bob is having trouble quickly reinforcing the penetration across the Donets with mechanized units (because of the river).

In the North, Bob finds the 5TK out of supply and several of his attacking units from the prior turn disrupted, allowing me some breathing room to bring in a panzer corps and a couple of panzer divisions to help shore up this line. The 75ID repulses the attack on Byelopolye (3206) which really helps stem this side of the front.


The Northern Shoulder at the end of the Russian 2nd turn
In the South Bob continues to advance across the Donets and Zhukov again attacks at great expense to both of us (3 steps lost to Bob, while I lost 2). But again I have several strong mobile formations in the area as well as some air units on defensive support, so his progress has been slow and costly. I have yet to counter attack with any Panzer Corps as I am deathly afraid of loosing steps in a magnitude two or three attack at low odds.

The Southern Front at the end of the Russian Turn
Aside from these two areas Bob has not pushed me off the initial German line. We paused at the start of the German 2nd turn and will resume this coming Thursday.

I have started tracking all the combats in the game as well, bellow is a view of them thus far. I think we can all agree that Bob needs some new dice. Three AR's, two C's and three EX's results are not to be expected and I fear that the dice gods will turn this around in the near future. Bob has lost 22 steps, while he's getting four replacement steps per turn, I have lost 10 steps and am only getting one a turn as replacements. Thus far Zhukov is doing fairly well in costing Bob 5 steps while he's inflicted three on me, just the kind of return you need from the Marshal.

Bob's Comments:

I attack with 5th Tank and other mechanized forces west and north ok Kharkov with poor results.  A substantial number of my attacking forces ended up disrupted witch would hamper any future attacks for a least a turn.  I can’t do much up north but hold on to my breach of his line with infantry units.  In the south I continue to attrite his forces with Zhukov steadily pushing West.  As I mentioned earlier this was not intended to be the major push but rather a diversion to keep stronger forces in the South.  I was partially successful but some strong units have been moved North.  The series of A1 results I goy around Kharkov have really slowed me down and will allow that area to be reinforced next turn so it appears that it will be a slug fest to take the City.

A looks at the Combat results from the first two turns

Saturday, March 5, 2011

Advanced Squad Leader (MMP) ~ "Splitting the Seam" [RBF-47]

Game: ASL
Scenario: Splitting the Seam [RBF-47]
Participants: Jeff "Jeffe" I, Myself
Time: Thursday, Mar 3rd ~ 5.15PM - 10.00PM

Round two in the annual Jeffe ASL frenzy phase had Jeffe selecting a scenario from Recon by Fire called "Splitting the Seam" (4/4 on ROAR). This scenario is designed by Chas Smith, one of the best scenario designers working in the game today. He has put together his own company and is publishing some fine products for ASL. Here is the link to his company, where you can look over his product line. The scenario takes place entirely on an overlay map from Beyond the Beachhead, by another publisher.

As Jeffe defended last time and because he's defended several times in his recent other games, I set up as the defender. This scenario takes place in July 44 in France. The British are attacking a village trying to clear it of German Infantry in the opening phases of Operation Bluecoat. There are a few SSR's but they are of little consequence, however Bocage dominates the approaches to the town. The scenario is 6.5 turns long and requires the British to clear out the Germans from the town, if the Germans control 6 or more buildings at scenario end they win, otherwise its a UK win. As you can see from the map, this is gonna be a bug hunt as the Brits are going to have to clear most of the map of German controlled stone buildings.

The Germans start the game with 3 4-6-7s, 4 4-4-7s and 2 2-3-7 half squads. Leading this force are a 9-1, 8-1 and 7-0 leaders. The force has 2 MMGs, 3 LMGs and a PSK. The German player also has 24 mine factors and 5 foxholes to bolster his defense. The British player has an impressive force for this scenario. They have a company of 1st line Infantry (10 squads), rather mediocre leadership (8-1, 2x 8-0s) and some light support weapons (2x LMGs, 2x PIAT and a 2in MTR). However this force is backed up by an impressive force of British armor. On turn 1 the British get a Churchill VII, followed on turn 2 by two more Churchill's and two Crusader AA tanks.

Jeffe has graciously accepted my offer to co-write today's AAR. I'll include his comments in Italics throughout the post.

Set Up

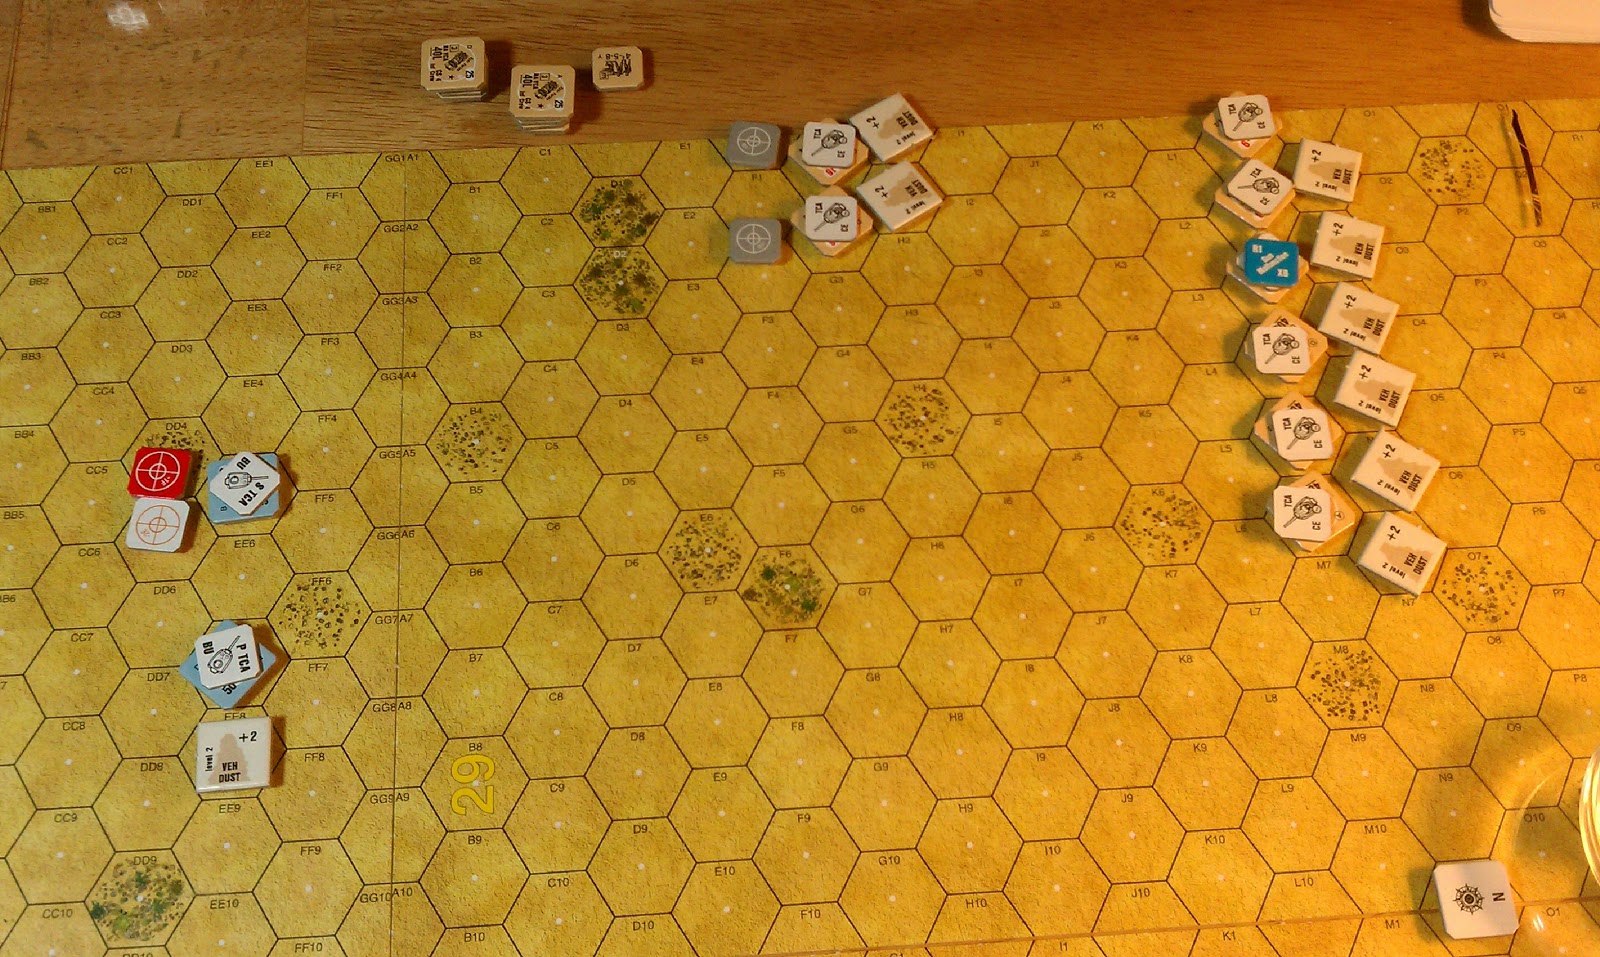
The first thing that caught my eye was that this was going to be a bug hunt scenario. Even thought the Infantry forces are roughly the same size, Jeffe's AFV's are going to play a big roll in the scenario. The second thing I thought was what the heck am I gonna do with those foxholes? I was also very concerned about the road spliting the town in two, Jeffe can easily cut off my forces on his side of the road on turn one by getting a force to hex P2. Thus I set up some mines and a foxhole with a 4-4-7 right next to the hex (I can only set up in hexes >= 3. I put the rest of the foxholes out of the way in what I thought might be a useful final stand position in the lower right hand side of the map. I also placed a HIP unit in the first level of the Z6 building to cover this line of approach as I thought that looked too temping an approach and this might lead to a nice surprise if I can catch him moving in the open at long range. There is a red die in the picture next to these units. The rest of my force if spread out covering the approaches to the town.

Initial German set up, Red Dice = HIP unit
Jeffe's Comments:
Looking at the mapboard on this, it appeared moving up my right had little advantage, as it was too open, and too far from the victory buildings. My left looked better, but again there was quite a good deal of open terrain. In the end, I decided going up the gut would be most prudent, since it afforded the most cover, and was the shortest path to the VC buildings.

Turn 1: That wasn't so bad
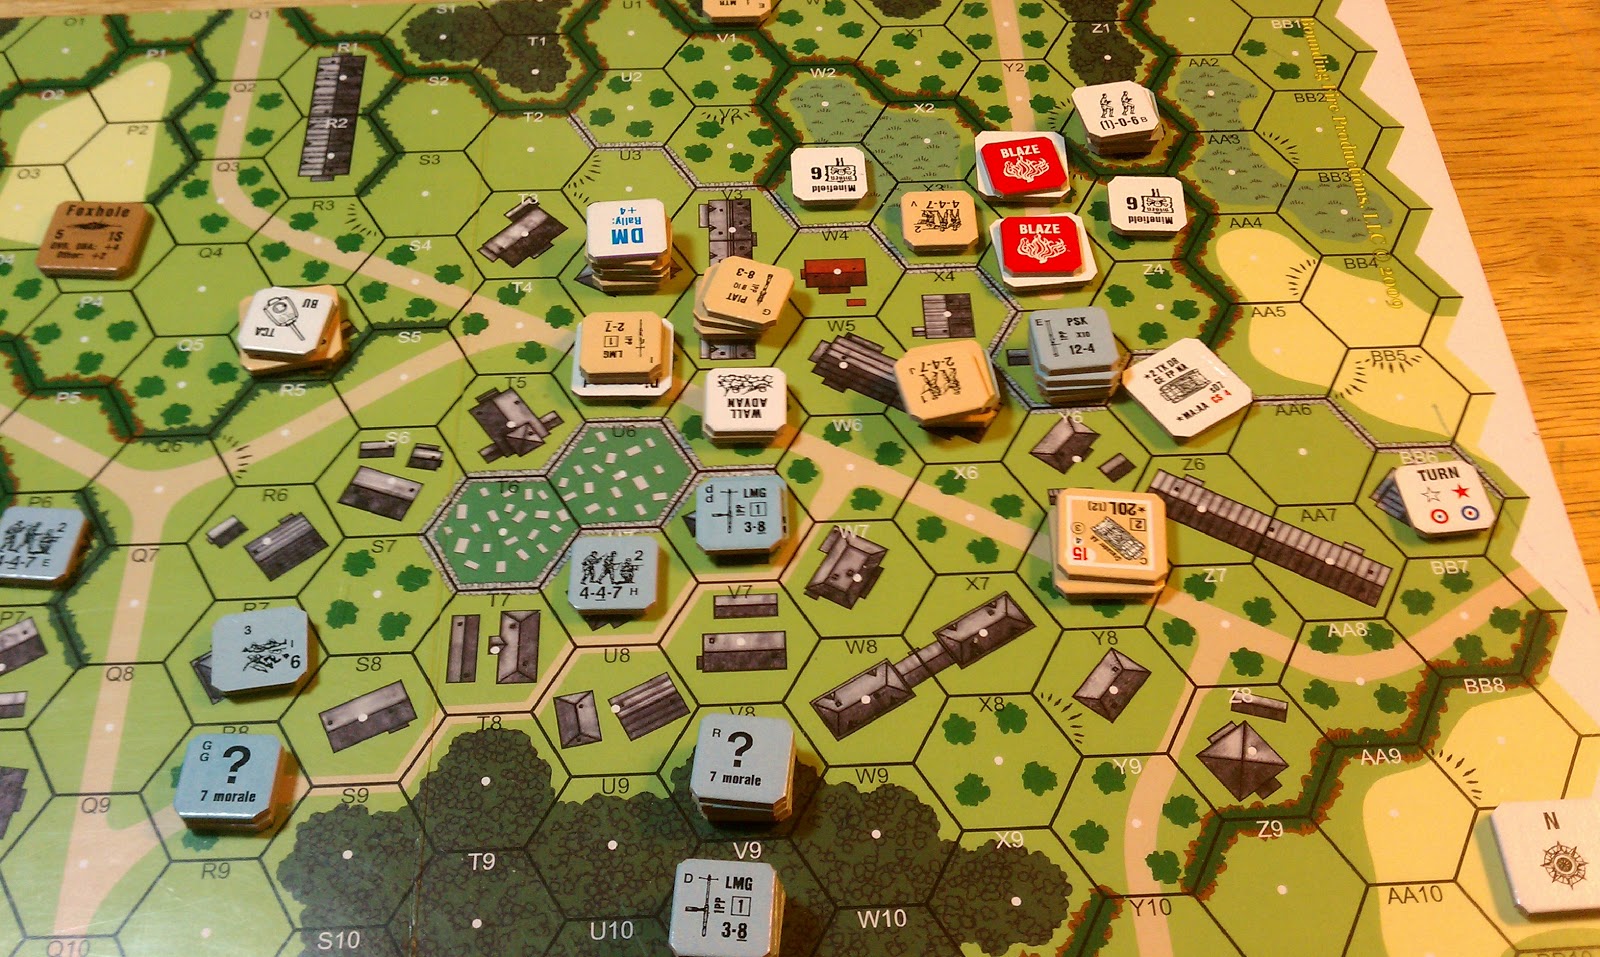

After SetUp
Turn one went well for me. Jeffe didn't go for hex P2 like I was worried he would and fell victim to my HIP squad in the 1st level of the Z6 building. Also he found one of my minefields on my right. The MMG in my center broke up his platoon in the R1 building, I think breaking two of the three squads and the leader in the hex. On the right, my HIP squad and LMG broke two squads as he entered the board just as I hoped he would. So things were going very well for me so far with five British MMCs broken.

Start of German Turn 1
Jeffe's Comments:

*Most* of the turn went without much consequence. I moved my guys up behind the first bocage line. In spite of my knowing better, I sent a large stack into the R1 stone building, most of which was promptly broken by final defensive fire. Over on my left side, I tried a small hook with 2 squads & a leader, but his hipster in lvl 1 of the z6 building zapped them when they came on.

Turn 2: Things keep getting better

Jeffe makes some progress in the center, clearing out a couple of buildings around U4. My MMG squad and leader on the left (near this progress) breaks and my other covering fire fails to stop him getting close to me in the center. I had moved my PSK over next to the wall in W4 and this get a Churchill during the turn as well. Additionally Jeffe found another minefield and this cost him another broken squad in W3.

Start of German Turn 2

Jeffe's Comments:
A good portion of my forces were broken trying to crack the MMG position in the V3 stone building, or remain so on this turn, along with one of my Churchills getting brewed up. I've not been able to rally many guys back. I'm starting to get despondent at this point, very nearly throwing in the towel, as I feel as though I gakked my setup, and my play has been very sloppy so far.

Turn 3: Oh Dear!
As I finished my second turn I was pretty happy with how the game was going thus far. Jeffe had made a little progress in the center, but had lost a tank and had perhaps half his Infantry broken. I was not taking losses to this point and continued to strengthen the center, where he was pressing. I felt like he was close to conceding, but didn't mention it. I knew he was unhappy with his entry choices and lack of progress. My expectations continued to rise, I was very confident at this point. Then something happened.

Jeffe started playing much more aggressively, throwing caution to the wind. I have been in his shoes many times with this game, you are close to loosing, but the night is young and you have little else to do, why not go a little crazy and perhaps create some luck or change the dynamics of the scenario? Thus without a word I was facing a new player, one that had discarded his caution and was now going all out.

The German Right, prior to CC

On the right Jeffe charged ahead with his armor. One of the Crusader AA tanks goes wild on Bounding Fire ROF and breaks my MMG squad and leader before I stun it with supporting forces. Jeffe then rushes in infantry (quite skillfully I might add) to ensure that this force will be eliminated due to failure to route. I also manage to Immobilize a Churchill as well but he is able to get into CC with me.

Meanwhile on my left I see Jeffe drive a Churchill into a key building (R4) and I am unable to do anything but watch (PF = miss), I do manage to break a leader and pin a squad rushing to help the now Bogged Churchill, but Jeffe gets a HS into the hex to help out in CC.

The German left, turn 3...Churchill bogged in building...
Jeffe had managed to turn things around, impressively. He was definitely back in it. Even though I had some spectacular failures, I still felt confident as he had shot his armored wad and while he made progress I still had most of my force left and he still had a long way to go to get into position for a win.

Start of German Turn 3
Jeffe's Comments:
Still despondent, and thinking that if something didn't break open, I would resign, I got daring (others would possibly call it silly). I drove one of my Crusaders straight at the (now malfed) MMG position in Y5, which has stifled any hopes I had of advancing on my left. I drive up, poop out some smoke, then go around the building. Thinking I could get back on the road around AA8, I realize at this point that I don't have enough MPs to do so, so I just stop and bounding fire, with great effect, keeping rate twice and breaking everyone in the AA8 building. after I kept rate the 2nd time, however, the big stack o' doom in X5 shoots a (16+2?) and stuns him. I'm pleased with the results however, as I know that if I can get a guy in to X4, everyone in Y5 will surrender.

On my right, I drive one of my Churchills straight at the squad that's holed up in the P4 building. Steve deliberates about whether to fire when I'm adjacent, or when I enter into bypass. He decided to hold off, and instead of going in to bypass, I ESB to enter the building, successfully. He misses the PF shot. This allows me to run a couple of guys up adjacent to him, and into CC. To avoid any suspense: The tank lives, but is immobilized.

I'm still not all *that* optimistic at this point. I've done some pretty (what some might describe as) foolish things, and I suspect I'll pay dearly for it in subsequent turns, but I have a glimmer of hope now, as I broke a couple of things open. Further, some of my previously broken squads have started to rally back.


Turn 4: Clouds gather

This turn was about the 2nd Crusader AA tank. I had lost in the prior turns melee contest and thus was starting to get a bit concerned. Jeffe continues to rally nearly all his broken guys while my Germans are not remotely interested in getting back in the fight (I have two broken squads in X7 that I need desperately). The now immobile Churchill is nicely placed to make my leaderless force on the left fear for its good order. Jeffe further exploits this with his 2nd Crusaders ride into glory. I manage to take out the first Crusader on the right in CC getting a hero at some point. I am starting to lose the battle with my own expectations though, I am getting more and more angry at myself for how things are going.

Start of German turn 4
Jeffe's Comments:
Things continue to go well for me, and go downhill for Steve. I get my 2nd crusader fired up, and drive straight down the road, pooping out a smoke along the way,  DMing his big stack o' brokies in X7, and keeping anyone from crossing the road to reinforce the conflicted part of town. He had previously broken up his big stack o' doom (which was a HUGE relief, as I didn't think I'd be able to get enough firepower on it to break it, and I wasn't gonna drive my Crusader adjacent to a 30+1 attack), with several of them in melee with a HS of mine. 

In the Rally phase, I manage to generate a hero and BH one of my squads, which is right next to said melee (which didn't turn out well for the Germans). I've had another Churchill die, but more of my guys rally up, and I'm really beginning to feel buoyed, but I can tell Steve is getting gloomy, except when I moved a leader intoT6, where his 'dummies' were, and he discovered that he had a full squad (that I assume he thought was a dummy, as well). We had a good laugh over that, and it made things interesting, as I thought I had that part of the fight almost sealed up.

Turn 5: Really?

Down, but not out I make a stand on the right, breaking a squad or two and advance into CC against a HS to DM his rally hospital in W5. Meanwhile my guys in X7 do not rally. I fall back in the middle, wanting to get away from that avenging Crusader and the fire from the immobile Churchill. This also allows me to take out a crew near the cemetery. As I should have expected, the CC against the HS in X5 goes badly, costing me another leader. Jeffe's Crusader again does amazing things allowing him to get a couple of squads next to me in the center. Finally Jeffe gets into melee with my hero and squad in Y5 and I can only guess how that one will turn out as well.

I am getting more and more despondent. The friction here is me and my expectations. Those terrible expectations grew and grew in the first couple of turns and now given these lofty expectations, surely I should be doing better then this, no? No. This is what kills me with ASL.

Start of German turn 5

Jeffe's Comments:
This turn was the back-breaker for Steve's defense. The two squads that were holding the center of town (including the newly 'discovered' squad) both broke and surrendered (I questioned whether I should have taken the prisoners after the fact, but realized they provided the free deployment to my squad, which was another body to gain building control). He didn't manage to do much on the other side of the road with his squad and hero, either. His big stack o' brokies was back in the V9 woods, and I managed to get my leader into the U9 woods to DM them, essentially taking them out of the game. I'm feeling pretty good about winning at this point. Steve has gotten grumpier, even arguing whether a -1 FFMO applies when I move into an orchard hex.... rattled me a bit that this would be questioned. He's just trying to lawyer up anything he can.

Turn 6: The End...

Start of British turn 6
I still have hope, I have 4 good order squads holding the line and the clock is ticking for Jeffe. Most of the town is still German controlled and while I am behaving more and more like a petulant child (internally I hope) I cant dream of giving up at this point, not after what the scenario and Jeffe's fine play has put me through. It is getting harder and harder at this point to call this fun, but I don't want to give in, yet.


My two squads in the middle (U7, V6) are the key, they are protecting the broken stack in V9 and holding off Jeffe from running around and flipping buildings. Amazingly I come out of the CC in Y5 alive, but these guys are not well positioned to inhibit his movement. Jeffe skillfully gets behind me, forcing me to break my squad in U7 on a FPF shooting his 8-0 as he makes a run for my broken guys in V9. I break and the game is lost, both of the middle squads are captured and I throw in the towel.

Start of German Turn 6
I'm very sullen and pissed off at this point (I know, its a game!). Jeffe is aware of my internal strife and is trying to lighten the mood. Its no good, I brood long after Jeffe is gone. ASL is easily my favorite game, hands down. It creates an amazing narrative, unlike any other game. The price for me at least is every so often I lose the battle against my expectations and end up angry at myself for it. Yet, in a few days, this game takes on a new light in my memory. I will remember Jeffe's excellent play in the second half of the game, him passing his internal personal morale check and turning things around to get the victory.

Jeffe's Comments:

Steve resigns during his part of the turn; he only had 2 GO MMCs left, and I still had 5 and a mobile AFV (the crusader) While I thought he could have still won (if only barely, and with a lot of things swinging his way), I certainly played the meta-game and decried his chances.  I've talked people into continuing and got burned by it too many times to do that anymore.

In the end, I had a great time. I really struggled with my PM for the first couple of turns, but felt like my play tightened after turn 3, especially being able to exploit opportunities (FTR opportunities, etc).


I wanted to thank Jeffe for sharing his thoughts and comments on this one. I can't wait for the next game with him.

Federation Commander (ADB) - FCOL Tournament Scenario

Game: Federation Commander (ADB)
Scenario: FCOL Tournament Scenario
Participants: Jim "HeavyD" D, Myself
Time: Friday, Feb 25th ~ 6.30PM - 9.00PM & Friday, Mar 3rd ~ 6.30PM - 9.00PM

HeavyD is running the 2nd annual FCOL online tournament, so once again I offered to play him in the scenario to help get him some practice with his selected Empire (Gorn). There is also something of a debate going on in the FC Forums about Plasma armed Empires and if Plasma is 'balanced' in FC. Locally, we are leaning towards that it is balanced, as much as things can be balanced in FC that is.

Locally we've been playing FC for nearly two years. I was the only person in our group that had any experience playing SFB, and this experience was nearly 20+ years ago. When we started playing FC, we started with mostly direct fire Empires, only slowly trying out the Romulan and Gorn Empires. Thus we had not gotten a lot of experiance with Plasma Empries. However recently with these various debates at the FC forums we have been playing a lot of plasma empries to get some experiance with them.

I'll say that flying a plasma armed ship requires a very different approach to the game. It took us each a while to come to these conclusions and many a scenario was lost by each of us as we tried various things out with the three plasma empires. Today we are all pretty comfortable with the standard plasma tactics, thus we are also in the camp that thinks they are not as bad as what some fairly vocal people at ADB are saying they are.

Now, the FCOL scenario is a slight modification of the standard Origins scenario that ADB using for their 6-8 person annual tournament. The scenario is a 6 turn game using the standard points based victory system on a fixed map. There are limits on how many ships of any one class you can have (generally no more then two). Each player has 450 points to use to buy ships with. The FCOL version is further restricted by the online clients (which I dislike) only having certain ships available (mostly the newer empires are not all in yet).

So HeavyD had let slip that he had a new twist to the plasma tactics, a variation of the 'star castle'. He had selected a DN and two HDDs for his force. That's a lot of plasma tubes, 1 R, 4 S and 6 F in fact. He was playing against a Fed squadron in the first round so I volunteered to play Fed and took 2 NCLs and 2 DWs, 14 photons total.

The game on the first night was only two turns. He drove to the center of the map on the first turn and at the end of the 8th impulse launched a type R at one of my NCLs. I ended the turn 14-16 hexes from him with the plan of getting to range 12 and firing all my photons and phasers and turning away, while going base speed of 24 to keep the plasma away. Turn 2 went as planed, I went 24, he 0, I came in, fired my photons getting hits with three of eleven and scoring some phaser damage. The net result was one of his HDDs with a nearly downed number one shield. He also fired off two more S torps and two F torps, none of these, nor the R ever hit one of my ships as all I did was make a wide circle dragging the plasma with me. We stopped there for the night.

Last night we finished the scenario. I was pretty unmotivated to even finish but I wanted to play it out for HeavyD's sake. HeavyD continued to castle which is a great anti-Fed tactic. I didn't want to even bother trying to figure out a way of getting into range for overloaded photons, so the game was over quickly the only result was HeavyD scoring some damage with phaser fire on one of my NCLs. No plasma hit any of my ships in the game. The final result was a victory for HeavyD.