Game: Advanced Squad Leader
Scenario: "Far from Home" [AP53]
Participants: Rikk "The Pirate" M, Myself
Time: Friday, Nov 11, 5.00PM - 10.00PM
I had not had a chance to try out any of the scenario's from Action Pack 6 yet, so when Rikk came out from Arizona for a long weekends visit, we decided to try out the first one. Action Pack 6 came with three new boards cut at a different angle then traditional ASL boards. These allow for a different feel as they are wider and come with some terrain that 'makes more sense' then the normal long and narrow ASL boards. The scenario's in the pack cover many none traditional actions as well. The theme being "a decade of war". Thus this first one takes place in Spain during the Spanish Civil War.
The scenario pits the Republican (represented by Russian counters and rules) forces against the Nationalists (Axis Minor counters and Rules). The Republican forces have just taken a town and the Nationalist forces are trying to take it back. The Victory conditions are very interesting. The National Forces have to score at least as many VPs as the Republican player. VPs are awarded for friendly unbroken MMCs occupying certain buildings. Thus each player can earn VPs for a given building, assuming they each have unbroken MMCs in it at the end of their RPh.
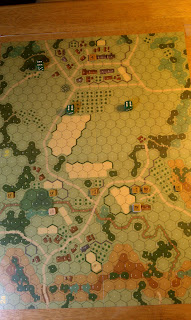 |
| Set Up |
The Republican forces set up first with a small force on board 2a. The force includes 6 4-4-7s, 3 2-3-7s an 8-1, 2 LMGs and one 51* (British) mortar. Interestingly, these forces are not able to set up in three of the VP eligible victory point producing buildings. Then on turn 3 a couple of T-26s enter as well along with an 8-1 armor leader. The Republicans are reinforced by a large for of Infantry on turn 4. This force consists of 12 4-4-7s, 2 2-2-8 crews, a 10-0 commissar, a 9-1, MMG, 2 LMG, 2 DC. This force is supported by two T-26 M33 tanks.
The Nationalists meanwhile have two groups of units. The group that sets up on board has 9 4-4-7s, 9-1, 8-1, MMG, 2 LMGs, 51* MTR (British) and 1 ATR. These forces set up on the South side of board 1a. They are reinforced on turn two by another force of Infantry (nearly the same as the first group) and six PzKfw IB (G). The tanks have inexperienced crews (like a 6-1 AL in the tank) in addition to being radioless.
As I began setting up I made a critical error. I didn't 'do the math' on the building control mechanics thus I was more or less in the dark about the specifics. I knew generally that I needed to try and hold the buildings on my side of the board as they paid points at the end of the game. I also knew that there were about six buildings on the edge of board 2a that paid VPs for the first three turns. Additionally there were two hexes (cross roads) that paid 5VP each for their control at the end of the game. Thus I knew all the mechanics, but I didn't go over it before I set up so that I know what I would have to do. It turns out that the VPs available are very tightly balanced between the two forces and the game will be decided by a narrow margin. In the end I don't think I would have done anything differently on set up had I gone through this exercise, but I felt like I had already given an advantage to Rikk before we made the first WC DR.
Turns 1-3
I have a small force to work with for the first three turns. Rikk will have tanks in my midst around turn three and I have little to defend against them with early on other then MG fire. I decide against trying to occupy the front to buildings (outside of my set up area) as I expect Rikk to come down the road in that direction with most of his force. I need to keep my guys alive and try and keep him out of the main town where VPs are scored at the end of the game. I don't have a lot of ways to interdict his approach either given my set up restrictions. He has to cross a lot of open ground, but I have few places to set up to cover this approach. Instead I put the majority of my guys on my right in and around the three VP paying buildings on my right. I throw a HS up on the level two hex on my far right to help strip some concealment. I lightly cover my left, planning to shoot and scoot there.
 |
| Turn 2 |
As expect Rikk brings 2/3s of his force down the road on my left, where I am spread very thin. There is very little going on in these early turns as Rikk spends the first two turns moving at full speed into the area. Rikk brings his turn 2 reinforcements in and sends most of the Infantry to my left with two of his tanks, sending the other 4 and remaining infantry to my right. I pull back a bit on my right as he moves into the VP buildings there. I am leaderless on this side of the map so I am very careful, only shooting if I have to.
 |
| Turn 3 |
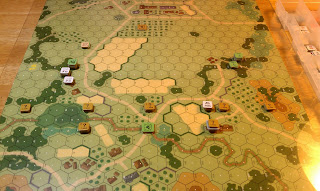
On his turn three Rikk moves up the level 2 hill on my right, sending my HS there scurrying away. Rikk also moves his 4 tanks on this side close to the building complex that is the cornerstone of my defense. In the middle he sends his remaining two tanks over the threaten the crossroads there. I have a squad and LMG here. On the left Rikk, with his main force continues to advance and clear out the buildings there.
Turns 4-5
 |
| Turn 4, on my right |
The bottom of turn 3 sees my small force reinforced by two T-26s and an 8-1 AL. I send these to the threatened crossroads and engage his two tanks there. Rikk makes his move on the building on turn 4. He sends one platoon of tanks in to tie up my infantry. He then sends a couple of squads to support the tanks. The other platoon of tanks goes over and engages my two tanks in the center. Close combat ensues and I get the tanks the used VBM to enter the building hex, while his infantry survives locking us in melee. One of his tanks in the middle breaks its MA (CMG) in advancing fire while I am able to take out another one in defensive fire. On my left Rikk is moving hard for the village and I have little there to stop or impede his progress. This though is where my reinforcements will arrive the next turn.
 |
| Turn 4, action at the crossroads |
 |
| Turn 4, the left |
My turn 4 sees the arrival of my reinforcements. I start with sending the two arriving T-26s over to my left to stop his advance towards the town. This is important as Rikk has nicely placed these units to interdict my arriving Infantry's movement. Thus I am forced to stay clear of a couple road hexes that would have allowed me to get closer to the center. Rikk takes a nice long range shot at my guys with his MMG on my far right (on the level 2 hill there with an 8-1 directing). I have a couple squads break here. In the advancing fire phase both of my arriving T-26s break their MA's.
 |
| Rikk assaults the building on my right |
 |
| Rikk sends his other Platoon of IB's to the crossroads |
Rikk's turn 5 sees his Infantry on my right pull back into the woods. Its clear he's not going to make any more progress on this side of the map. In the center at the crossroads I am down to one tank as is he. I have killed two if his with a third recalled. The pressure on my right grows and Rikk takes one of the buildings here. I cleared his infantry out of the two-hex building, but he's still got the lone tank adjacent with a lot of squads still in the vicinity. More importantly though, neither one of my T-26s fix thier MA's. As I only have a snowballs chance at this point in the game, I throw in the towel.
 |
| Problems on my Left |
 |
| End of my Turn 4 |
This was one of those scenarios that I lost and still cant really articulate what I should have done differently to not lose. The broken MA's were an afterthought because even by that point, I knew I was loosing. The two five VP hexes are also a key factor at the end of the game. I had hoped to drive over to the other side of the board to occupy one of them with a T-26, while maintaining control of the one on my side of the board, but this was a long shot as my sole remaining T-26 that had the range to get there was now alone and thus would have to roll for non platoon movement. Additionally by having that tank make a run for it, I would have to leave the other crossroad hex unprotected.
 |
| End of Rikk's turn 5 (end of game as well) |
The ROAR on this tells me that I am in the minority in being clueless on what I should have done as its fairly balanced there. I did really enjoy the game though and that of course is the important part after all. The new maps are really a great addition to the system and I look forward to more scenarios using them. Rikk and I are also big fans of the early armor game, so we really liked that part of the scenario as well.


This is on my playlist so was even more interesting to read. Agreed, Forts new boards are rather nice, playing a Friendky Fire scenario based on it.
ReplyDelete