Game: 1914 Twilight in the East
Publisher: GMT Games
Scenario: "The Battle of Ivangorod"
Participants: Bob H, Myself
Time: Sun 2/19, 2.00PM - 4.00PM
1914 Twilight in the East is one of my favorite games. Bob pushed me to play it back in 2008 and it was an easy sell once I got it and looked it over. The game takes a previous WWI game system and improves on it. It's a Division level game covering the entire Eastern Front in the first few months of the Great War. Hexes are five miles and cover the length of the front from Eastern Prussia to Romania. The maps are fantastic, they are highly detailed and very pleasing on the eyes. The counters are equally pleasing and convey a large amount of information. Bob and I have played the Tannenberg scenario many times and the Galicia scenario once.
Recently the designer (Michael Resch) published a Journal which, among other things contained several new scenarios. Bob and I selected the tiny "Battle of Ivangorod" scenario to reacquaint ourselves with the game after more then a year away from it. The Journal can be had
here directly from the designer. It's a full color professional product filled with some excellent analysis and history covering the period the game is involved in. This scenario is intended as a starter in that it is very light on some of the rules overhead the game contains, choosing to focus on the fighting around Ivangorod in October of 1914.
 |
| Starting positions |
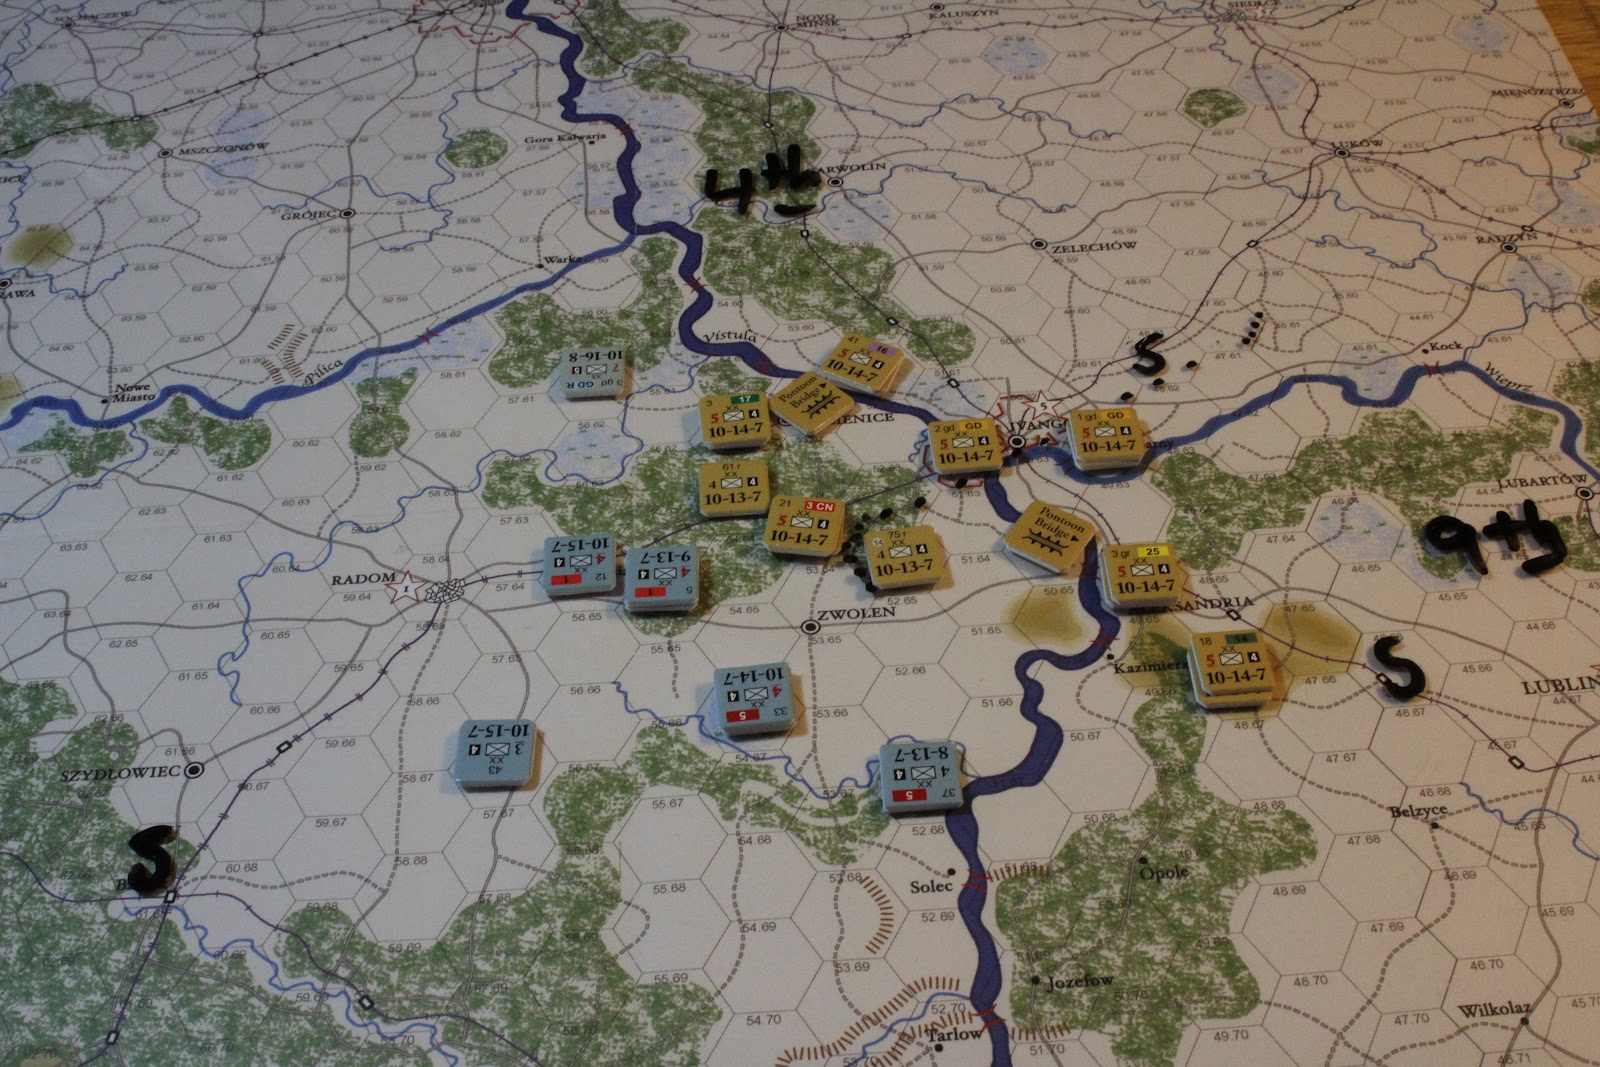
The scenario opens with the Austro-Hungarians assaulting the Russian bridgehead across the Vistula River near Ivangorod. The AH player is the attacker and has to push the Russians back. The victory conditions count the number of hexes on the West side of the River for victory subtracting the number of Prepared Attacks made by the AH player, the AH side needs to get the Russians down to six or less to get a win. As I mentioned the special rules eliminate several of the systems found in the normal game making it very easy for new or inexperienced players to get a grip on the basics of movement and combat. The AH have two strong Corps in play supported by one attached German Division. The Russians have components of two Army's on the map (4th and 9th) with a couple three Corps in each of these Armies). The Army boundary is right in the middle of the Russian position somewhat limiting what the Russian player can do as he has to keep units from each army on their side of the boundary. Bob naturally was the AH player, giving me the Russians. The scenario is only 1.5 turns long with the AH player going first, then the Russians and then one more AH half turn.
 |
| Bob makes his first turn Moves |
The set up has the Russians a bit more spread out with some of the units back across the River. The scenario also takes place in the fall so we'll be using that CRT and associated terrain costs, in the Fall the CRT is harder on the attacker and movement is more costly then scenarios that take place in the Summer. Bob opens the game with two Prepared Attacks. A Prepared Attack costs the attacking player 3 movement points while giving the attacker a one column shirt on the CRT. Additionally units that are subject to a PA are unable to move during the counter movement phase. Perhaps its a good time to give an overview of the games mechanics.
 |
| End of AH Movement, 1st turn |
 |
| End of Russian Counter-Movement phase, 1st turn |
A normal half turn (normally the Russian player with go first, but not in thus scenario) will have the phasing player move first. Each unit may use its full allotment of MPs (normally 7) and has the option to force march to gain an additional 3MPs. During movement, the phasing player will place attack and prepared attack markers. Then the non-phasing player will conduct reaction movement. This allows him to move any of his units that he wishes half their movement allotment (usually 3.5MPs), force marching is also allowed for the reacting player. The reacting player can place attack markers also, but in not allowed to place prepared attacks in his reaction movement.
The phasing player then conducts all of his combats followed by the non-phasing player. Combat is a multi-step process. The attacker will determine the odds, there are various column shifts that can apply for both the attacker and defender then the dice are rolled. Once the result is determined you then determine losses with each player rolling on another chart to see have many (if any) steps were lost and to generate a modifier to use on the final step. Artillery weighs in on this step by adding a modifier to the die roll. The column you use to roll on is based on how big the battle is, there are 4 sizes from less than two divisions to massive 6+ division battles. Lastly each side will roll on the Effectiveness chart (or take a moral check if your an ASL player). This tests each one of your forces effectiveness (moral/organization) taking into account retreats and casualties. If you roll badly you might have to retreat suddenly after stopping the attack on the CRT. The game tracks each units effectiveness individually and continuous combat will eventually catch up to you.
 |
| Initial AH attacks, turn 1 |
 |
| After the Combat phase, turn 1 |
Bob opens by launching to Prepared Attacks on two of my lone divisions. He closes in with the rest of his units. During my reaction move I am able (via force marching) to reinforce the 61r division with the 21/3CN unit. I am unable to reinforce the other attack against the 75r. The attack against the 61r & 21/3CN goes very well despite it being a 2-1 when Bob rolls a 2 (2d6), I retreat two hexes, take two steps losses and each units losses a EL level. The battle is costly for Bob and he takes the same losses as I do (2 steps and -1EL). Bobs 2nd attack goes well (3-1 this time) sending the 75th back two hexes. The result of this has my 52'd Division out of supply at the start of my next turn. I should point out that we did not take 5 steps off of the 75th Division like we should have per the scenario instructions.
 |
| End of Russian Movement Phase, 2nd turn |
 |
| End of AH Counter-Movement phase, 2nd turn |
My movement phase sees me launch my own set of PA's (despite the advice given in the analysis of the scenario) as well as getting the remaining divisions on this side of the Vistula. Bob counters with an attack of his own while reinforcing (again via force march) one of my PA's. My attack in the South with the 25th Corps does nothing but cost my Corp an EL level and each of us a step lost. I do not push him out of the hex. The attack on the German 3gd is equally inconclusive with neither side causing or taking losses or EL. My last PA against his 1st Corps (12 & 46) again fails to dislodge him but I came out better inflicting two steps lost to my one with each of us loosing an EL. Bob's lone attack is a disaster. He has two divisions (14 & 33) from his 5th Corp attacking my 61 reserve division (2-1). He blows the EL check at the end and looses 2 EL and has to retreat one hex. This is a good example of why I like the combat system so much in this game as it models both the strength of the two sides but also thier effectiveness and you sometimes see some really interesting results come from a fairly normal 2-1 attack. My out of supply unit forces Bob to retreat out of the way, costing one of his units another hex that he'll have to make up in his upcoming turn.
 |
| Start of Last turn |
 |
| Russian EL chart |
At the start of Bob's next turn (and the scenario's last) we are sitting at a net of 10VPs. Thus Bob needs to take two hexes while making at least two PA's to get a win. I will have my counter movement phase and any attacks that I can put up to counter him with. For Bob there isn't much to do but send in the troops again, he makes two PA's, one against the OOS (52nd) division in the middle and the other against the shaken 25th Corps. During my counter move I launch two attacks while reinforcing the OOS division with a division from the 16th Corps.
 |
| End of AH movement, last turn |
 |
| End of Russian counter-movement, last turn |
Bob starts off with the attack against the 47th and 52nd (oos). This is a big 5-division battle, Bob has three attacking from two hexes (all from the same Corps) against my two. The odds are 1-1 and go to 2-1 for the PA. Bob rolls well on the attack and pushes me out of the hex. Losses are light (1 step ea) but when we roll for effectiveness Bob blows one of the rolls sending two of his divisions retreating back one hex with 2 EL lost. Thankfully his other division keeps its cool and is able to advance in and take the hex.
 |
| An Example of the Combat process |
His second attack goes much better and pushes the 25th Corps back, forcing them to run back across the Vistula in the process. Thus he's taken his two hexes and launched two PA's, he'll win if he can survive my two (counter) attacks. The Germans again brush aside my assault by the 17th Corps with each side taking one step lost and no EL. My last attack pits the 14th Corps against a lone AH division. I fail to take the hex on the CRT and Bob finishes the game with another 2, this time on the EL check and his division stands giving him the win.
 |
| Final Positions, end of scenario |
So this is a great little scenario for learning the game or getting used to it after some time away. We are next going to go back to our favorite scenario and play Tannenberg.


This was a great example. I too am playing this scenario and your example was great for getting me through the mechanics. Thanks.
ReplyDeleteI envy you having a FtF opponent, I will have to find a PBeM opponent when once I'm up to speed.
Thanks for the replay. Good to see this big game in a smaller chunk. Looking at the before and after, it's hard to see as an Austrian "win". Is grinding out wins a feature of this game?
ReplyDeleteVery nice example of plan. Just one little nit. Non-prepared attacks are only designated in the combat phase, not the movement phase. The phasing player doesn't have to commit himself becore non-phasing counter-movement, while the non-phasing player doesn't commit himself until he has seen all the results of the phasing player's combats.
ReplyDeleteTom Kassel
"Bob makes his first turn Moves"
ReplyDeleteIs that a (cough) "pincer movement"?? :D
I have had this game since P500 but only JUST convinced my FtF boardgaming circle to play it.
Currently three turns into Tannenburg and completely enjoying :)
Just admiring your work and wondering how managed this blog so well. It’s so remarkable that I can't afford to not go through this valuable information whenever I surf the internet!
ReplyDeletesource link