Powered By Blogger

Sunday, February 19, 2012

1914 Twilight in the East (GMT) ~ 29.7 The Battle of Ivangorod

Game: 1914 Twilight in the East
Publisher: GMT Games
Scenario: "The Battle of Ivangorod"
Participants: Bob H, Myself
Time: Sun 2/19, 2.00PM - 4.00PM

1914 Twilight in the East is one of my favorite games. Bob pushed me to play it back in 2008 and it was an easy sell once I got it and looked it over. The game takes a previous WWI game system and improves on it. It's a Division level game covering the entire Eastern Front in the first few months of the Great War. Hexes are five miles and cover the length of the front from Eastern Prussia to Romania. The maps are fantastic, they are highly detailed and very pleasing on the eyes. The counters are equally pleasing and convey a large amount of information. Bob and I have played the Tannenberg scenario many times and the Galicia scenario once.

Recently the designer (Michael Resch) published a Journal which, among other things contained several new scenarios. Bob and I selected the tiny "Battle of Ivangorod" scenario to reacquaint ourselves with the game after more then a year away from it. The Journal can be had here directly from the designer. It's a full color professional product filled with some excellent analysis and history covering the period the game is involved in. This scenario is intended as a starter in that it is very light on some of the rules overhead the game contains, choosing to focus on the fighting around Ivangorod in October of 1914.


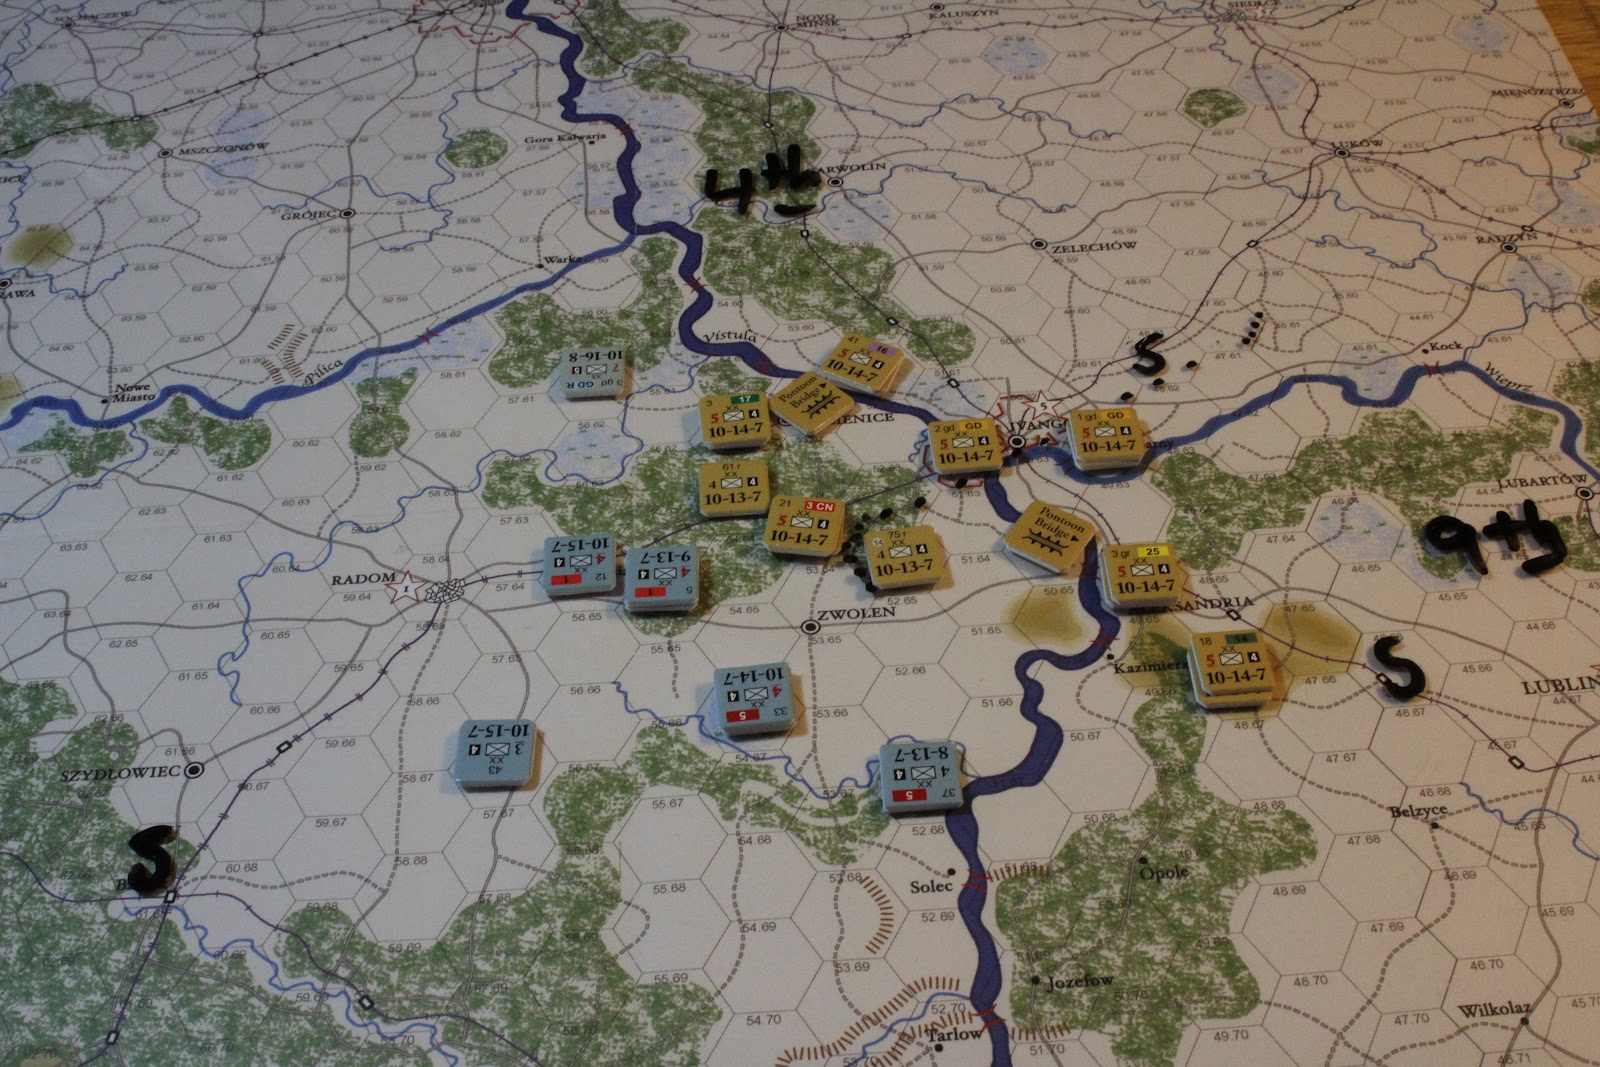
Starting positions
The scenario opens with the Austro-Hungarians assaulting the Russian bridgehead across the Vistula River near Ivangorod. The AH player is the attacker and has to push the Russians back. The victory conditions count the number of hexes on the West side of the River for victory subtracting the number of Prepared Attacks made by the AH player, the AH side needs to get the Russians down to six or less to get a win. As I mentioned the special rules eliminate several of the systems found in the normal game making it very easy for new or inexperienced players to get a grip on the basics of movement and combat. The AH have two strong Corps in play supported by one attached German Division. The Russians have components of two Army's on the map (4th and 9th) with a couple three Corps in each of these Armies). The Army boundary is right in the middle of the Russian position somewhat limiting what the Russian player can do as he has to keep units from each army on their side of the boundary. Bob naturally was the AH player, giving me the Russians. The scenario is only 1.5 turns long with the AH player going first, then the Russians and then one more AH half turn.
Bob makes his first turn Moves
The set up has the Russians a bit more spread out with some of the units back across the River. The scenario also takes place in the fall so we'll be using that CRT and associated terrain costs, in the Fall the CRT is harder on the attacker and movement is more costly then scenarios that take place in the Summer. Bob opens the game with two Prepared Attacks. A Prepared Attack costs the attacking player 3 movement points while giving the attacker a one column shirt on the CRT. Additionally units that are subject to a PA are unable to move during the counter movement phase. Perhaps its a good time to give an overview of the games mechanics.

End of AH Movement, 1st turn

End of Russian Counter-Movement phase, 1st turn
A normal half turn (normally the Russian player with go first, but not in thus scenario) will have the phasing player move first. Each unit may use its full allotment of MPs (normally 7) and has the option to force march to gain an additional 3MPs. During movement, the phasing player will place attack and prepared attack markers. Then the non-phasing player will conduct reaction movement. This allows him to move any of his units that he wishes half their movement allotment (usually 3.5MPs), force marching is also allowed for the reacting player. The reacting player can place attack markers also, but in not allowed to place prepared attacks in his reaction movement.

The phasing player then conducts all of his combats followed by the non-phasing player. Combat is a multi-step process. The attacker will determine the odds, there are various column shifts that can apply for both the attacker and defender then the dice are rolled. Once the result is determined you then determine losses with each player rolling on another chart to see have many (if any) steps were lost and to generate a modifier to use on the final step. Artillery weighs in on this step by adding a modifier to the die roll. The column you use to roll on is based on how big the battle is, there are 4 sizes from less than two divisions to massive 6+ division battles. Lastly each side will roll on the Effectiveness chart (or take a moral check if your an ASL player). This tests each one of your forces effectiveness (moral/organization) taking into account retreats and casualties. If you roll badly you might have to retreat suddenly after stopping the attack on the CRT. The game tracks each units effectiveness individually and continuous combat will eventually catch up to you.

Initial AH attacks, turn 1

After the Combat phase, turn 1
Bob opens by launching to Prepared Attacks on two of my lone divisions. He closes in with the rest of his units. During my reaction move I am able (via force marching) to reinforce the 61r division with the 21/3CN unit. I am unable to reinforce the other attack against the 75r. The attack against the 61r & 21/3CN goes very well despite it being a 2-1 when Bob rolls a 2 (2d6), I retreat two hexes, take two steps losses and each units losses a EL level. The battle is costly for Bob and he takes the same losses as I do (2 steps and -1EL). Bobs 2nd attack goes well (3-1 this time) sending the 75th back two hexes. The result of this has my 52'd Division out of supply at the start of my next turn. I should point out that we did not take 5 steps off of the 75th Division like we should have per the scenario instructions.

End of Russian Movement Phase, 2nd turn

End of AH Counter-Movement phase, 2nd turn
My movement phase sees me launch my own set of PA's (despite the advice given in the analysis of the scenario) as well as getting the remaining divisions on this side of the Vistula. Bob counters with an attack of his own while reinforcing (again via force march) one of my PA's. My attack in the South with the 25th Corps does nothing but cost my Corp an EL level and each of us a step lost. I do not push him out of the hex. The attack on the German 3gd is equally inconclusive with neither side causing or taking losses or EL. My last PA against his 1st Corps (12 & 46) again fails to dislodge him but I came out better inflicting two steps lost to my one with each of us loosing an EL. Bob's lone attack is a disaster. He has two divisions (14 & 33) from his 5th Corp attacking my 61 reserve division (2-1). He blows the EL check at the end and looses 2 EL and has to retreat one hex. This is a good example of why I like the combat system so much in this game as it models both the strength of the two sides but also thier effectiveness and you sometimes see some really interesting results come from a fairly normal 2-1 attack. My out of supply unit forces Bob to retreat out of the way, costing one of his units another hex that he'll have to make up in his upcoming turn.

Start of Last turn
Russian EL chart
At the start of Bob's next turn (and the scenario's last) we are sitting at a net of 10VPs. Thus Bob needs to take two hexes while making at least two PA's to get a win. I will have my counter movement phase and any attacks that I can put up to counter him with. For Bob there isn't much to do but send in the troops again, he makes two PA's, one against the OOS (52nd) division in the middle and the other against the shaken 25th Corps. During my counter move I launch two attacks while reinforcing the OOS division with a division from the 16th Corps.

End of AH movement, last turn

End of Russian counter-movement, last turn

Bob starts off with the attack against the 47th and 52nd (oos). This is a big 5-division battle, Bob has three attacking from two hexes (all from the same Corps) against my two. The odds are 1-1 and go to 2-1 for the PA. Bob rolls well on the attack and pushes me out of the hex. Losses are light (1 step ea) but when we roll for effectiveness Bob blows one of the rolls sending two of his divisions retreating back one hex with 2 EL lost. Thankfully his other division keeps its cool and is able to advance in and take the hex.

An Example of the Combat process
His second attack goes much better and pushes the 25th Corps back, forcing them to run back across the Vistula in the process. Thus he's taken his two hexes and launched two PA's, he'll win if he can survive my two (counter) attacks. The Germans again brush aside my assault by the 17th Corps with each side taking one step lost and no EL. My last attack pits the 14th Corps against a lone AH division. I fail to take the hex on the CRT and Bob finishes the game with another 2, this time on the EL check and his division stands giving him the win.

Final Positions, end of scenario
So this is a great little scenario for learning the game or getting used to it after some time away. We are next going to go back to our favorite scenario and play Tannenberg.

Sunday, February 12, 2012

Strafexpedition 1916 (Europa Simulazioni) ~ Scenario 1, "The Drive on Pasubio"

Game: Strafexpedition 1916
Publisher: Europa Simulazioni
Scenario: #1 "The drive on Pasubio"
Participants: Bob H, Myself
Time: Thu, Jan 19th 7.00PM - 9.30PM
         Thu, Feb 2nd 7.00PM - 9.00PM
         Sun, Feb 5th 3.00PM - 5.00PM

Were it not for Bob's eclectic taste in games I would never have even known about a game like Strafexpedition (SE). Bob has always had a thing for games on the Austo-Hungarian Empire (not that there are a lot of them), as well as for games covering WWI. Bob let me know that he'd received this game earlier in the year and said it was one that he's like to play. Since I could hardly refuse his request as he's ever willing to try out games that I'm interested in, I ordered the game from the publisher and did my bit to support the European wargame economy.

When game arrived a couple weeks later I dived into the rules. I was pretty impressed. The rules are well written and very accessible. The game covers the Spring Offensive the AH unleashed on the unsuspecting Italians in the Alps around Trentino. The Austrians were trying to cut off the larger Italian forces further east by attacking here. Most of the Italian Offensive operations were further East. The game comes with a couple page article on the actual operation which I found very valuable and well written. The designer also takes a page up talking about his design process and the history of the game, again I found this very interesting.

The games scale is 900 meters per hex with units being Battalions of Infantry and Batteries of Artillery. There are also leader counters that are used to activate a formation (usually Brigades) during the turn. There are also Fortress counters. There are two maps covering the area of operations. There are five scenarios starting with a very small introductory scenario with a couple of one map  scenarios and of course the campaign that features the entire operation (May-June, 1916).

Italians set up, AH stating to set up

As I mentioned the rules read very nicely and after reading them I was even more interested in trying out the game. Prior to our playing of this scenario we set up the small intro scenario and played through that one. A turn consists of getting reinforcements and supply, then allocating that supply to your leaders (Brigades) and then rolling for initiative. Each player rolls a die and adds in the number of supply points that he has allocated for the turn. Once the initiative is determined that player will then select from one of his supplied leaders and place that leader on the map, this allows him to activate units of that Brigade for movement and combat. The amount of supply allocated determines how much artillery that leader may use over the course of its activation.

Bobs initial attacks on my left on turn 1

After Combat

Combat is very straight forward and takes little time to resolve. The attacker opens with a bombardment, selecting various artillery units that are in range and that have not yet fired during the turn then rolls on the bombardment table. This table will cause units disorder, losses and can also destroy trenches. Once the bombardment is over the defender can then defensive fire with available adjacent units and artillery that has not yet defensive fired for the turn. Most Infantry units have a machine gun factor (the small number in the middle of the two other numbers) that he uses to resolve defensive fire, artillery can also help out on defense albeit at a fraction of its normal strength. After defensive fire is resolved the attacker then makes his assault on the hex with remaining units, with a limit of two units (or less depending on the terrain) per hex. You will often see the attacker assign more then two units to one attack so that he'll have a choice of which units to actually use in the assault as some of his attacking units will get shot up prior to the attack. It is this assault that can force a defender from the hex allowing the attacker to move in.

Bobs assigned supply to his leaders

Once that leader has moved/fought all of his units, the player with the initiative will then select another leader to activate until he's used all of his supplied leaders. The defender can attempt to preempt the attackers activations as well. In our game this rarely seemed like something to consider. The non-initiative player will then activate his supplied leaders. Once he's done the initiative player will move all the rest of his units (those that were not activated previously) followed by the non-initiative player. Supply is then checked and replacement steps are placed on the map.

I liked the rules and how interactive they were, I wasn't expecting something like this from a operational WWI game. We decided that Bob would be the AH player in our first 'real' playing of the game. In looking over the scenario we looked at the map and the starting locations and how many victory points Bob would need to get a win. It looked like a tough one as he's really got to make a lot of progress over the course of the five turns of the scenario.

The Drive on Pasubio

All of my Italians start entrenched (at least those on the front line) which is nice because there are some big holes in my line. I had little behind these front line units other then some militia battalions and these were of low quality and without machine guns. I had a decent amount of artillery but little supply available in the opening turns to make use of it other then for the occasional defensive fire support. I get reinforcements on on turn 2 as well as turn 4, additionally I start getting supply points beginning on the 2nd turn which I need to start to entrench as you cannot entrench unless you are assigned a supply point.

Bob during his 2nd turn


Italian 2nd Turn
 Bobs first turn was mixed, he had some good attacks and there were others where he wasn't able to take the hex. As this was our first real playing we really had no idea this early in the game to tell how one side was faring over the other. On my right where the terrain is the heaviest I had some key hexes hold out that created a bit of a traffic jam for Bob as some of his not alpine troops couldn't cross or pass certain rough hexes. On the left where the terrain is a little flatter I was getting smashed. My center which starts with the fewest units had some units cut off as well. I did little in my half of the first turn as most of my guys were roughed up or too far behind the line to lend assistance. Most of my artillery just sat there being unable to move or fire (lack of supply) offensively on the first turn.

Bob's AH attackers on turn 3 on my Right

Bob's attackers clear the road to Posina


I got reinforcements on the second turn as well as starting to receive supply points. I got about a brigade's worth of troops on my left. Bob was starting to get a little better at attacking on turn two. He was learning that fewer attacks with more artillery support was the preferred method. We also discovered another cool feature of the rules in how artillery can limit supply roads. This would prove an interesting mini game as I would often debate on leaving an artillery unit in a very dangerous position in order to cover Bobs supply roads knowing that I would likely loose the unit but I could often put a group of units out of supply by doing so. Another this we picked up on was that in order for an attack to keep going you will have to rotate units in the attack as attacking leads to much disruption and attacking with a disrupted unit is asking for trouble. The defender will also (when he can) want to send units a couple hexes back to try and reorganize before sending them back up into the line.

Bob's mounts as attack on my Right

...and is pushed back

Bobs attacks on my left continued but when my reinforcements showed up it started to look like he'd have a hard time taking the VP hexes in this area. In the middle Bob blew big holes in my lines but then ran out of supply as he was unable to supply his lead units, thus the attacks started to funnel down the roads on this side of the map. On my right Bob was starting to clear the initial line and make some progress. I had taken a lot of losses and he was able to make some nice progress. On my far right he was again slowed by poor performance on his attacks.

Turn 3, Bob moving...Yellow dice are the VP hexes

The road to Valmorbia...turn 4
 Turn 3 saw these deeper road based penetrations expand. Most of the last lingering units on the front line were now gone having either been eliminated or reduced by lack of supply. But the clock was ticking and Bob had only taken 3-5 VPs thus far.

By turn 4 we were seeing that Bob was behind the curve as it was looking like he would run out of time before he'd get the VPs he needed for a win. I also got the last of my reinforcements this time on the right, which was exactly where I needed them most. Bob got close to Posina here and this was where he would win it if he could be getting to the VP locations before I could with my reinforcements. Bob also lunged down the road towards Valmorbia on my left. I had only some militia here and quickly reinforced this area.

My Italian's counter Bob's move

As it was getting late we took a close look at the Victory situation at the end of the fourth turn and decided that it would be nearly impossible for Bob to get the needed VPs for a win. He was essentially playing for a draw at this point so we decided to call it a game at this point.

End of turn 4

All in all I was pretty impressed with the game, it was a lot more fun then I expected and was pretty interactive for a battalion level game. The one sided nature of the scenario however means that the defender has to basically get smashed for five turns in this scenario. The campaign game which is much larger will see the Italians have a chance for some counterattacking.

Saturday, January 28, 2012

Twilight Struggle (GMT)

Game: Twilight Struggle
Publisher: GMT Games
Participants: Jim "HeavyD" D, Myself
Time: Fri, Jan 27th 7.00PM - 11.00PM

It was HeavyD's turn to select the game for our Friday night session and he selected Twilight Struggle. We are both fans of the game, having played it quite a bit in the years after its initial release. This was only our second playing in the past year. In our first playing we had both not played for some time and although we were a bit rusty had a good game with HeavyD wining a convincing game as the Soviets. This game felt a little closer and we were much more tighter with the rules (with one notable exception!).

Early War

I pulled a complete bone head move in the opening headline phase. I was the Soviet player and I selected CIA CREATED as the headline event. I was still not with it as the last time I played I was the US and my declining intellect thought that since I was the US last time, this would be a good opportunity to play this card. Well, I was the Soviets and thus gave HeavyD a huge head start on the opening turn. I had a scoring card (Middle East I think) in my hand (which I had to play with in view of HeavyD for the entire turn) and it was ugly. At the end of the turn he was up 4 VPs which it unusual for a US score early game.


Start of Turn 2

Despite my blowing the Headline phase, I wasn't in bad shape on the board at the start of the 2nd turn. I had pushed him out of Iran and taken control of Iraq, Syria and Egypt. He had control of Israel, Lebanon and Jordan. More importantly I had expanded into Pakistan and Afghanistan, with some influence in India already. Europe didn't see much action at all and was still in flux.

Asia and the Middle East, start of turn 3

Turn 3 started to look better, I was making good progress on the board and got a couple VPs back. Asia saw most of the action with HeavyD expanding into SW Asia, while I was able to get control of South Korea and India. I had Dominance there and it was going to be hard for HeavyD to make up the ground. We started to see the Defcon level stay at 2 resetting to three at the top of the turn, where I would usually Coup early in the next turn to get it back to 2. This made is very hard for HeavyD to make progress in Europe, Asia and the Middle East. In Asia and the Middle East I had more BG countries then he and was close do Dominance as well. The America's were still largely inactive as is normal for the first few turns of the game.

Mid War

Turn 4 started with me ahead on VPs by +4. I was either Dominating or at least ahead in BG Countries in both Asia and the Middle East. Europe was still flat but HeavyD had made some progress there getting a little closer to Dominance. He had the De Gaulle event and was able to play it and then get ride of my influence there in the same round. I had made some good progress in South and Central America during turn three, gaining control of Cuba, Panama, Venezuela and Columbia. 

Start of turn 5

Central and South America were the focal points for the whole of turn 4. We both spent a lot of cards spreading influence there. A couple of times HeavyD had good success with realignments. I would either have to react with a coup or replace the lost influence right away. Turn six followed much the same path as the game was nearly always at Defcon 2 for the whole turn and limiting HeavyD's ability to Coup & Realign in the regions where I had the upper hand (Asia & Middle East). These were action filled turns with lots of Coups and realignments going on in the America's. We had furious battles over Cuba and Mexico with HeavyD finally getting the upper hand in those two areas. The scoring cards were adding VPs to my bottom line over these turns as well. Africa saw very little action except where I was creeping across North Africa so that I could eventually get back into Western Europe.

Start of turn 7

Turn seven started with me at +10 VPs and still holding strong in Asia and the Middle East. I was able to spread out into central Africa but the majority of the action stayed in Central and South America. I had the initiative. I had the upper hand in Asia and the Middle East and was staying slightly ahead in South and Central America. HeavyD was forced to react to my ventures, countering with realignments and coups. I was also staying 1-2 boxes ahead on the space race and this proved helpful several times as I was able to send a 2nd card into space on a couple of turns while HeavyD had to deal with my events in his hand the best he could.

Late War

On or around the 7th or 8th turn I realized that I had made an error in dealing the cards. I had been dealing out to a hand size of eight instead of the nine we both should have had. We corrected this for the late war and concluded that we both suffered equally so little action was required other then my own annoyance at making such a rules blunder over the course of several turns.

The Late War Begins, Start of turn 8

The prior couple turns HeavyD was able to start threatening in Europe and I believe we had one scoring there where he had Domination. I was able to get back into France and re-balance the situation late on turn six through. HeavyD had stabilized the situation in Central America, finally getting me out of Mexico and Cuba, but he wasn't able to get into a Dominance position there. South America was still very volatile with neither of us wanting to give up on that region. I had a three to one advantage in BG countries but was not going to get Dominance there due to HeavyD having spread all kinds of influence into the none-BG countries. Asia had turned into a backwater with neither of us spending much influence there, I still had a couple BG country lead in the region. HeavyD was able to score SE Asia though for like 5 VPs. Still I was maintaining my lead in both VPs and overall board position.

Europe and the Middle East turn 9

Turns 7 and 8 were a wild ones. I had Aldrich Aims, The Reformer and Glasnost in my hand when the turn opened. I started with Aldrich Aims (forcing HeavyD to discard a card and then play with his hand revealed. I then played the Reformer and Glasnost back to back to make some serious trouble in Europe. We saw all kinds of influence being poured into Western Germany while I was able to lock down control of France and Spain while making a play at Italy. HeavyD spent the whole turn chasing me, reacting to my moves by burning his big cards to make up progress I had made. Israel opened up as well and became a magnet for influence (via Suez Canal). Africa also came to life as we both started to pay attention to it. South and Central America both settled down with neither of us doing much there for the rest of the game.

Turn 10 opened with me at +12 VP and didn't last the whole turn. HeavyD was suffering from my knowing his headline due to the space race and I was able to make it pay. HeavyD tried one or two cards plays as last gasps but the writing was on the board, I was leading in nearly all of the regions with at least more BGs then he with a 12 VP lead there was nothing left for him to do but concede the game.

The Cold War Ends, Red Victory turn 10

This one was a good one, we both had a good time. Around turn 3 or 4 I was getting a little annoyed at the dice but at the same time I could see that I was still making progress and slowly gaining the upper hand. I really like how this game sees the focus shift with one player often taking the initiate and forcing the other to react to him. I felt like that was the case for most of the game. Getting the upper hand in both Asia and the Middle East early was big as I was able to then force the action to other places never allowing HeavyD a chance to come back and try and redress the lead I had in these two area's. Europe got a little scary for me and was the one point in the game where I thought I was reacting to HeavyD. But in a rare case of Late War event usage I was able to address that and move on. We've rarely seen some of the events played as events as we did in this game, usually the USSR player will take these strong late was cards (Reformer, Glasnost et al) and use them for opps. For once I found that the events proved more valuable then the Ops points. This game remains a favorite here with us.


Tuesday, January 24, 2012

Commands and Colors: Napoleonics (GMT) ~ "River Coa" & "Bussaco (Reynier's Assault)"

Game: Commands and Colors: Napoleonics (GMT)
Scenarios: "River Coa" & "Bussaco (Reynier's Assault)
Participants: Jim "HeavyD" D, Myself
Time: Fri, Jan 13th 7.00PM - 10.30PM


 HeavyD and I elected to get the big boy blocks out for our Friday night session. We started with the next scenario in the book, "River Coa". This is a smaller scenario and the first one that introduced something a little different in the Victory Conditions. This is handled in the Special Rules, any ordered Anglo-Portuguese unit that exits the map via the bridge hex awards the A-P player a Victory block err counter. The river is otherwise unfordable. The Fortress in the scenario is treated just like a town, and now that I am writing this I think we blew that and treated it as a Field Works.  The scenario is on the smaller side in its size, but it has 6 banners as the Victory Condition. We diced for sides and I got the attacking French.


I opened with a "Cavalry Charge" card on my right. It went very badly, I lost one unit outright and the other withdrew. Then the action shifted to the my left and stayed there for the rest of the game. I spent a couple turns getting set up to make use of another Cavalry Charge card I had in my hand. Then the time was right so I set off with my second charge of the evening, this one proved much more entertaining. It spanned across several turns and only involved a few of my units and some of Heavy's. It was brutal and fast.


The first attack to go in HeavyD didn't square, he either forgot about it or was distracted. I went in with a Heavy Cavalry unit against a Line plus leader, I pushed them back with a couple blocks loss and then advanced and attacked them again. This time they were eliminated. I advanced into the vacated hex. In this game, like CCA a cavalry unit may advance and battle after a victorious battle. I took advantage of that here to great effect. HeavyD quickly got wise and squared up with his Light Infantry, the target of my other Cavalry Units attention. This cost HeavyD a card and that was tough as we each only had four card hands for this scenario.

An Amazing Ride:


HeavyD was caught card-less in that he couldn't react to my attacks on his Right due to lack of cards. Thus I was able to then go right after the fortress. I again charged in and eliminated the two Portuguese units there. I was again able to do a double attack, HeavyD was also prevented from squaring in the Fortress which help out quite a bit. I was up 3-4 flags to 2. Again HeavyD didn't have any good cards to activate units near the focal point (he only had three cards at this point). I had no interest in waiting around for him to get the cards he needed to go after my sole Heavy Cav unit so I continued the attack and was able to clear off another British unit (Rifle Light) on the hill overlooking the Bridge. I believe that Heavy elected to not go into square at this time because he didn't want to then have a two card hand.

End of Scenario board positions

When I cleared the unit and leader off the hill next to the bridge I had six blocks and we were done. Forty minutes! Well that was pretty exciting, much more for me, but we both had some good laughs at this amazing show put on by my overachieving Heavy Cavalry Unit.

As the night was young, we turned the page and set up the next scenario in the book, "Bussaco (Reynier's Assault)". This one again had a Victory level of 6 blocks on thick terrain. It pitted a combined Anglo-Portuguese force facing Massana's advancing Frenchmen. This one featured heavy hills and a lot of Portugues, mostly on the right of the line. There are no special rules aside from the fordable stream. The AP player has a hand of 6 while the attacking French have a hand size of 5 and move first. I took the Brits and Portugues on defense as I had just attacked.

Bussaco (Reynier's Assault) Set Up

My opening hand had both of the Counter Attack cards in them so I put on my best poker face as HeavyD slowly marched his Infantry towards my Portugues line on the right. I believe he was aided early on by a Grande Maneuver card to expedite his approach. The initial clash opened on my right where I played my two Counter Attack cards back to back on his initial melee attacks. I pushed him back with little loss in these.

Bayonet Charge, HeavyD Assaults the British Left

Heavy then threw down a Bayonet Charge card and attacked the British lines on the left. He pushed back my far left unit and took out a couple blocks from my lone British artillery unit at little cost to himself. I did have cards that enabled me to shoot back at him and I soon drove off this attack as he lost a unit or two and pulled others back who had suffered some losses.

Final Positions
 At this point HeavyD started working on the edges trying pick off my depleted units. He had suffered some heavy losses at this point and was starting to run low on troops. I was also low on troops and pulled some of the harder hit units into the center to try and shield them. I believer we were both at around 4 victory blocks each when out of no where I got two flags but taking out an infantry unit and then getting the leader. I was not expecting this as HeavyD's dice had warmed up quite a bit in this scenario. Rarely when we play two CCA/CCN scenarios in one night does one person win both of them as happened tonight. But, I think I can say that HeavyD had a good time despite this and the second scenario was a much closer game, going a about an hour and a half in duration. Another great night of gaming with a great game. 

Sunday, January 15, 2012

Advanced Squad Leader (MMP) ~ "Batty-P" [AP74]

Game: Advanced Squad Leader
Scenario: "Batty-P"
Publication: Action Pack 8
Participants: Jim "HeavyD", Myself
Time: Fri, 12/30 7.00PM - 10.30PM
         Sat, 12/31 11.00AM - 3.30PM

Action Pack 8 has arrived. HeavyD and I were both eagerly awaiting this product so we decided to play something from if for our next ASL "Training Wheels" session. HeavyD narrowed it down to three scenario's letting me select the one we played from these. I selected this one due to the size and the force composition. This Action Pack comes with three new "long" maps, that is the maps are cut and folded differently yet they represent the same footprint allowing map and scenario designers a bunch of new options. The maps are "wide" so its like playing ASL on a new planet as the board seems are in new places.

"Batty-P" takes place in Italy (all of the scenarios from the pack are based in Italy) on the day of the Salerno landings. The situation finds the Royal Fusiliers defending a town from an advancing German kampfgruppe bent on reaching the beaches on the first day of the invasion. The terrain is affected by SSR's, Orchards are Olive Groves, Grain = Vineyards and Brush = Cactus Patches. This makes it a little more costly to get around and has effects on LOS as well as some slight bog chances. Both players, prior to set up will also place three Rubble counters each, starting with the British player. The Rubble placement can be quite important; as the defender you can try and channel the attacker while as the attacker you can 'destroy' certain buildings that you'd rather not have to deal with. The other SSR's add flavor to the scenario and I think address certain OB issues (more crews for the British for example) while taking into account the period (September '43).

The British have 10 4-5-7's and 2 2-2-8's led by three leaders (9-1, 8-1, 7-0). They also have a nice selection of support weapons (MMG, 3 LMG, PIAT, 2 51* MTR, DC) as well as some added (+6) concealment (any British unit setting up in concealment terrain may do so concealed). This initial force sets up South of the Hill overlooking the town. There is another force of 3 Carriers (MMG A, 2 C's) and two lethal 57L AT Guns. The Carriers have 2-2-8's as inherent crews and the two C Carriers have PIATs as well. The British are reinforced with one Stuart III(a) that is an OP tank on turn 2. 

British Set up

The German's have a very nice force. The infantry portion consists of 7 5-4-8s (ELR 5) along with 8 4-6-7s. This group is led by four leaders, a 9-2, 9-1, 8-1, 8-0. The group has 2 dm MMG, 3 LMG 2 DC. Supporting this Infantry are several AFV's; 3 Pz IVH, 2 StuG IIIG, 1 StuG IIIB and 2 PSW 222(L). The Germans can set up on/North of row BB (this means on some of the hill, including several of the level 3 hex hilltop locations) as well as being allowed to enter on turn 2 along the North edge (behind the hill) and/or along the West edge of the map North of hexrow M. This gives the German player many options and makes the setup for the British player that much more difficult.

After both sides have set up

I ended up with the British. As I looked at the map I knew that HeavyD would be looking down on me for the whole game as he can set up on a couple of the level 3 locations. The victory conditions are pretty cool. The Germans win by controlling more stone building/rubble (there are 7) hexes than the British. The catch is that there can be no good order British Infantry within 2 hexes of any of the hilltop (there are 4 of these) locations. Thus the German player must keep the British off the hill while at the same time taking a majority of the stone building/rubble hexes in the town. As the Action Pack is just off the presses there is no ROAR information available. I placed rubble in hexes near the first line of stone locations while HeavyD elected to take out the chapel location with two of his rubbles.

Initial Set Up and Opening Turns

Looking over HeavyD's options I wasn't sure about what route he'd take (everyone on the hill, or spreading his force out). I knew that he'd have to leave some forces up on the hill to prevent me from getting close to the hill tops. I decided to deploy a thin line of half squads and concealment counters near the base of the hill. I did place on squad and LMG along with a crew and MTR on my right. With the denser terrain I knew that I'd easily be able to interdict his movement down off the hill while allowing me to pull these guys back. The rest of my force set up right in the town equally spread out to cover all the stone locations. I placed the two AT guns on either side of the town close in to the second line of stone locations. I knew that this was very conservative but I didn't want to risk placing them further away from the main area of defense. HeavyD elected to place the 2 STuG IIIG's on the hill along with his two MMGs and 5-6 of his 4-6-7s. This meant his main effort would be coming in on turn 2 along the West side of the map.

The Scene of the crime, my MMG takes down HeavyD's 9-2 & 3 squads

Turn 1 started off with a bang. HeavyD walked three squads, 2 dm MMGs and his 9-2 into a level 1 open ground hex about 9 hexes away from my own MMG and -1 leader. HeavyD obviously didn't pay close enough attention to my set up as my MMG was in a level 1 location in a row-house and had a clear LOS to the hex. As expected, I pulled off an impressive string of ROF shots that left all three squads KIA and the 9-2 wounded. This was a crippling blow to suffer so early in the scenario. The 9-2 was effectively out of the game for good and it would take several turns for HeavyD to get those MMGs back and then into the action. HeavyD nearly threw in the towel at this point, but decided to stick with it as we had already invested a couple hours of our time. He would defiantly be playing catch up for the remainder of the game. I knew that I would pay for this latter in the scenario as the dice Gods would surely wish to pay him back for my impressive rolling.

Start of British Turn 1

End of German turn 2
 Turn 2 saw the arrival of HeavyD's flanking force. The turn started off well for HeavyD, his 9-1 which had come over the help clean up the mess the wounded 9-2 had created turned heroic and also BH'd, giving HeavyD another shot at 9-2 management. The StuG's sitting on the hill began the turn by opening up with fire on the town (no SMOKE) which was ineffective. HeavyD moved to cover the hilltops while diverting some squads down to get the MMGs. The flanking force made a quick entrance as I was unable to put any fire on their approach. HeavyD swarmed all of his AFV's in one tight area on the left side of the Village. This would have been a disaster if I had set up my ATG's on this side of the map. As it was I was able to start firing on one of them while he broke an MA on one of his IVH's in advancing fire. The two PSW's ran off to cover area's that might have had my ATG's and thus didn't play much of a role in the first couple turns.

HeavyD starts his assault on the Western end of Town

My turn 2 saw me convert one of his IVH's to a burning wreck (ATG fire) while the gun crew broke to defensive fire. I dismounted my poorly positioned Carriers and did some slight adjustments to my defense. I wasn't able to do a lot of moving aground at this point as there were the two STuGs on top of the hill as well as a couple of 1st line squads.

Start of British turn 3
 Turn 3 saw HeavyD start dropping SMOKE on me from the hill (this would continue over the course of the game). HeavyD also tried to get across the road on the West side of town and was stopped cold. Meanwhile his much reduced Infantry on the hill continued to cautiously advance on my picket line. HeavyD lost a PSW when he moved it next to one of the stone rubble locations. I still don't know what he was thinking with this move. But at least now he did have some additional cover for his remaining AFV's (there is always a bright side). My half of turn three was largely uneventful as I again made slight adjustments to my line. I did manage to get my OP tank destroyed though. This unit in this scenario is a tough one as the German player will almost always have a 75L or two on top of the level 3 hill, this really limits where the Stuart can go and what it can do. I'm sure there are clever uses for it that I have not figured out...

Mid-Game, Into the Town


The Germans get into Town, turn 4

Turn 4 was a good one for HeavyD. He dropped a whole bunch of SMOKE on my left allowing his Infantry to finally get into town and up close to its defenders. The Infantry from the North was also starting to make its presence felt. I had the ATG on this side destroyed as well (I think it was from a CH or at least a KIA on the possessing unit). HeavyD moved one of his PSW's around to the South of the town as well. I had a squad or two break but was still largely in good shape with the rest of my force. My half of the turn didn't lead to much, I didn't really break much with my defensive fire, but at least I didn't suffer for it.

Getting closer, end of German turn 5

HeavyD was able to make another couple of hexes progress on turn 5. I lost one of the stone locations (the 2nd I'd lost) but was able to rout my units out of there into the row-house. The Infantry coming down from the North also made some progress with most of them slipping by my light screen and getting right up close to the row-house. I managed to take out another IVH with PIAT fire and the second ATG uncloaked to the discomfort of the remaining PSW's crew which had unwisely decided to park nest to its HIP location. HeavyD was still getting SMOKE from the STuGs on the hill and this helped him get in close while it also protected my from his fire.

End Game, Three Melee's

Start of the last turn (GT6)

Turn 6, the last one, opened with HeavyD still in it. He had battled back from a wretched first turn to a shot at pulling it of here in the last turn. I thought he handed this part of the game very well. He's certainly remembering how to ride his ASL bike now that we've played a few games in the past few months. I had done the math and knew that I had to keep him out of the stone locations to win on the last turn. He'd have a lot of trouble getting into melee and once he was there he'd still have to eliminate my units completely to gain control of the hex. But he had had done well in setting up this last turn and at least was still in it.

Mid-Turn 6

The action was intense as HeavyD threw in the kitchen sink doing all that he could to get as many units into Melee with me as possible. This included some well placed SMOKE on the my left along with the sole remaining IVH (broke MA) moving over to the right to place some SMOKE to help cover the advance of his Infantry. Not a lot of breaking happened while he was moving, but several times he had to sacrifice one unit to set up the approach of others. In the end he was able to get units into the three stone location hexes that he needed but was unable to clear out any of the hexes using close combat. Final tally was two stone locations under German control to five under (although melee was still taking place in them) British control.

Turn 6, Movement Phase

Turn 6, CC Phase...HeavyD goes 0-3 in CC

I think HeavyD was glad that he kept playing. I know I was happy he did, this was a very enjoyable scenario. The terrain alone was worth the price of admission. I really love the layout of the new maps and cant wait to play more scenarios from this pack. I really liked the Victory conditions as well, allowing the British some options while forcing the German player to maintain control of the hill tops. The SSR's depicting the arid terrain of Southern Italy also added some nice flavor to the scenario. I also like nearly any scenario set in 1943 as we have yet to see the advent of proficient Infantry anti-tank weapons while most of the AFV's gotten bigger and better. This was a great way to end the ASL year on a high note. HeavyD is certainly back on the ASL bike after a couple years away and we both look forward to the new year and all of the new ASL products just around the corner.

End Game