Powered By Blogger

Saturday, March 24, 2012

Advanced Squad Leader (MMP) ~ "Gabriel's Horn" AP75

Game: Advanced Squad Leader (MMP)
Scenario: "Gabriel's Horn"
Publication: Action Pack 8
Participants: Jim "HeavyD", Myself
Time: Sat, 3/3 ~ 11.00AM - 3.30PM


HeavyD and I have been on an ASL shame cycle. Each of us has had a scenario we would have liked to forget. I started it off by misreading the SSR's to AP78 "Crossfire". This was uncovered on the 3rd turn and I promptly threw in the towel as it was a catastrophic misread. I thought that the row house black bars were not there, making each row house a cluster of single hex buildings. This prompted me to set up based on this and it wasn't until the third turn that my error was uncovered. HeavyD followed up on our next try while playing "Point d'Appui" (U5) by performing one of the most interesting assaults using half tracks and squads. It was a spectacular failure and we stopped on the second turn. Despite these two failed attempts at playing ASL at a competent level we are both fully infected with ASL fever and thus selected another scenario from AP8 for our next scheduled game. 


It was my turn to pick and I selected "Gabriel's Horn". This is a medium sized scenario with an impressive ROAR record (9 to 9 when we played it). As with the other scenario's in this Action Pack, it's got interesting and somewhat complex victory conditions. HeavyD and I are both a fan of these even though they increase the risk of us failing the Victory Condition Task Check which can occasionally lead to a embarrassingly short game. This scenario has the US player as the defender. There are two groups of Americans of roughly Company size. One group sets up on hill hexes of board 5A (one of the new maps that came with the pack) while the other Company sets up in the town (board 60) about a half a map away. Each Company is a mix of 1st line and Green units with a good assortment of support weapons and fairly average leadership. The Company that sets up on the hill can set up in Foxholes. The Germans have a little more than a dozen squads (4-6-8 and 4-6-7), good leadership and average support weapons. This infantry force is supported by four StuG's that enter the board on turn 2. The German player also has a module of 80mm OBA directed by an off board observer. 


The Victory Conditions tell us that its going to be a bug hunt and the American player is the Bugs. The Germans have to control all of the level three hill hexes on board 5a as well as controlling three more three-hex stone buildings on board 60 then the Americans. Then Germans also have to score twice as many CVP's then the Americans. Simple right? My ASL self confidence was low so prior to the game I Googled the scenario and read through several AAR's (something I don't usually do until after I play a scenario) and found some good ones. These helped my get my bearings while at the same time presenting several different options for each player.


Set Up
HeavyD set up first. He elected to put the Company on the hills together on one hill instead of spreading them out (to the extent that the set up will allow). The Company in the town is more restricted in their set up and thus they were tightly packed in the center of the town. The Germans can set up Concealed (regardless of terrain) at least two hexes away from the hill top American Company. It's pretty clear that I am going to have to take down the hill based Company first and then clear out some of the town. I liked HeavyD's set up, I didn't want to risk setting up too far away on some of the level 3 hexes because I would be too far away from the action. His set up thus forced me to set up mostly in open ground down slope from him. I selected two sides from which to attack and set up the other third of my force to make a run into the town on the first turn. I knew that I wanted to send some troops into the town to force him to defend it and to distract that group from supporting the defense of the hill with their two mortars. I planned on having the StuG's arrive on the North side of the map to help crack the hill (as needed) while also going straight towards the town. 


Start of American Turn 1
German Advance on the Hill (Turn 1)

I started off by realizing that I failed to make use of the preregistered hex and my ASL id plummeted! I recovered though as my AR didn't drift off map and I drew a black card. The two MMG based fire groups I had set up broke their targets but others remained good order so I was forced to play it extremely cautiously during my movement phase. I was able to get into Melee on one of the foxholes while I mostly did one hex assault moves for the rest of my force. HeavyD's return fire broke only one of my squads. My other group ran their buts off towards the town. They were able to get into the town unobserved and via the advance phase make good progress. 

Cat and Mouse in the Town on the Hill (turn 2)

German Artillery impacting the American Defenses (turn 2)
 HeavyD's turn saw him shift a couple of squads over to support the two that were facing my tired group in the town. The mortars in the town didn't have any good targets to fire on so HeavyD started to move them down the hill into better terrain to get an LOS on to the hill and allow them to fire (because they started mostly in buildings). On the hill HeavyD was able to break some of my troops while the Melee failed to produce a victor.  My OBA came down nicely on the North side of his defenses and did some serious damage with a CH on one hex. HeavyD was able to rally most of his broken guys though.


Turn 2 was still very cautious for me. In the town I carefully advanced using the stone buildings and concealment where I could. We were almost even on squads here so I was only trying to tie up his guys and didn't want to invoke anything too risky at this point in the scenario. I needed this force to still be around in a couple turns when (hopefully) my other group will be coming over from the hill. I sent three of the StuG's towards the town. I regretted this as I spent my last stop MP as it occurred to me that one lucky mortar shot would yield HeavyD 6 or so CVP's that I would then have to double to stay in front. The odds were good though as my StuG's were only a few hexes away shooting at HeavyD's mortar crews in the +1 TEM cactus terrain. This also prevented him from supporting his forces on the hill. 


Start of American turn 2

Turn 2 was lively on the Hill. My OBA continued to perform well as I adjusted fire one hex over and blasted another couple of hexes worth of HeavyD's defenses. My Southern section suffered a couple of broken squads but I was able to clear the Melee hex giving me LOS to the whole top of the hill. I was also able to get a squad into the foxholes on the other side of the hill as well. Lastly I sent one of the StuG's up the hill and would be on position to drive right up on top on the next turn as I had broken his squads that had BAZ's. He's was down to only a couple good order units and routing was becoming very difficult for him. HeavyD's 2nd turn went well for him in the town. He was able to break a couple of my squads. My StuG's broke both of the mortar crews though and they routed up and into the town.


Hill Overrun (Turn 3)


Turn 3 saw the American defenses on the hill broken. I was able to break most of the defenders with Prep Fire and drove the StuG up on the hill cementing the collapse by forcing most of the broken units to surrender. I shifted the OBA over to the town where I drew a black card (after drawing a red). I had a good rally phase on this side and was able to re balance the situation there. I even started to turn his flank as well. With the collapse of the hills defenses and the progress I made in the town HeavyD conceded. I had 4 complete turns left to just take a couple of the buildings having already met the other two victory conditions.


Game End Positions (End of German Turn 3)

Both of us were a little relieved that is appears like we are coming out of our collective ASL funk. My OBA really turned the tide on the Hill getting two CH's. This hastened the collapse of the defenses there and sealed Heavy's fate there. I also had a very good Rally phase on turn three getting nearly all of my broken guys back in the town. While I wouldn't call this and outright dicing, they certainly helped my cause. Both of us felt like we both played a fairly good game and we also agreed that this is a tightly balanced scenario.

Wednesday, March 7, 2012

1914 Twilight in the East (GMT) ~ 29.5 "The Tannenberg Campaign"

Game: 1914 Twilight in the East
Publisher: GMT Games
Scenario: "The Tannenberg Campaign"
Participants: Bob H, Myself
Time: Sun, Feb 26th ~ 2.00PM - 5.00PM
         Sun, Mar 4th ~ 2.00PM - 5.00PM


At long last, our return to Tannenberg. This game and specifically this scenario has already provided many hours of enjoyment for both Bob and I. We have played this scenario at least three time, and have seen each side win, sometimes in dramatic fashion. This is a game that both of us really like and one that is smack in the middle of our collective wheel house. Bob is attracted to anything that features the Austo-Hungarian Empire. I find the tightly written rules and competitive nature of the game appealing. The artwork is first rate as well. I have read 6-8 books on WWI that I would likely not have read had I not played this game. So it is with these high expectations that we start another playing of Tannenberg. 

For those that are not familiar with Tannenberg (and I was one of these prior to this game) it is an amazing piece of history filled with drama and huge consequences. The campaign opens with the Russian 1st Army set to invade Prussia while the 2nd Army hurriedly tries to get into the action further South. The Russians outnumber the Germans but this is deceiving as your average German Division is quite a lot more potent then it's Russian counterpart. The Russian player is also saddled with the pre-war Strategic Objectives which greatly restrict the movement of the two Russian Armies. However once the Russian 2nd Army gets into the fight the German player will have his hands full if he hasn't dealt a strong blow to the 1st Army. 

This scenario is ideal for learning everything about this system. The Campaign is a very manageable one map affair with a fairly low counter density. The Campaign also puts heavy emphasis, indeed stresses many of the games operation themes (supply in particular). You will become a railroad baron at the same time that you master the art of an early 20th Century quartermaster. Unlike the vast majority of operational scale games I have played, you will open your thought process thinking about repairing RR tracks and what your supply line needs to look like at the end of the turn. Once you have considered these options you are then able to think about committing you Divisions to Battle. The German player is under constant pressure on two fronts, trying to hold off two Russian Armies with too few units. The Russian player has to operate within the restrictions of his Strategic Objectives while at the same time extending his supply lines far enough to support his advancing units. The game is nothing at all what I would have expected in a Division level game covering WWI. This Campaign does an amazing job at capturing this drama in equal amounts for each player. 

At Set up with Army Objective highlighted

As I was the German player the last time we played, I took the reigns of the Russians. Having just played the excellent "Battle of Ivangorod" scenario (replay here) from the recently published Journal (also highly recommended) I was amazed at how rusty I still felt as we sat down and began. This coming after spending a good amount of time re-reading the rules as well. As the rust started to give way, recollections of prior games started to creep back into my consciousness. In our prior game the Russians were dealt a catastrophic defeat very early in the game that they were unable to recover from. This was weighing heavily in the opening turns and as a result we both played a very conservative first three turns. 

Opening (turns 1-3)

1st Army Opening Positions

Before I start on the narrative it is important to talk about supply as it drives everything in the game. In order for a unit (generally Divisions) to be in full supply (and thus able to use its Artillery) is has to be within range of its Corps supply train unit. Each Corps usually contains two and sometimes three Divisions. Each Corps has a supply train counter, the counter represents the Corps supply hub. In order for a Division to use its Artillery in a battle, is HAS to have access to a supplied Corps train. A Division without Artillery is at a severe disadvantage as Artillery drives losses in the combat process. Corps Trains need to be within range of an Army Depot. Each Army usually has two, a major and minor. The major depot allows unlimited AP (artillery ammunition) while a minor only allows 4 APs per turn to flow through it. A Corps fighting a battle in which one or both/all of its Divisions is fighting and using their inherent Artillery will use one AP point. Army Depots are restricted to RR lines, they can only move along RR lines over the course of a turn (at most 12 hexes). In order for a depot to move further then that it has to pack up and move, causing it to be unable to provide supply for two turns after it has relocated. Further complicating the situation are the two sides different RR gauges. Each player has a limited supply of RR engineer points that he can use to convert track over to his sides use. You are forced to pay close attention to this in order to plan a successful campaign. Most of the time I am spending at least as much time if not more thinking about supply and RR lines then I am about moving units and fighting. Don't confuse this long description with dissatisfaction with the mechanics, to me (and Bob) this is one of the best parts of the game.
1st Army, start of turn 2


Start of Turn 2

The 1st Army is best suited in the opening turns to start off being aggressive. I elected to play it safe and make sure that I advanced my supply lines along so that I would be able to concentrate my forces against Bobs. Two of the Russian 1st Army Corps (2 and 4) start further South then the rest of the Army and are tied much closer to the limited rail lines located there. In the North I had two Corps (3 & 26) that start very close to the main rail lines and are very close to the 1st German Corps. In prior games we usually see some fighting here in the opening turns, but Bob and I were having none of it this time. We were both very slow in this area. I focused on marching the 2nd and 4th Corps closer to the main line of advance, leaving the other two Corps basically in place while I moved in the two Corps from the South. The Corps train units are not allowed to force march so its very easy for the Infantry to run far in front of the trains and this can lead to trouble. 


13th and 6th Corps start out across the Swamps

2nd Army Minor Depot redeploys to support the 1st and 15th Corps Advance

The 2nd Army is in worse shape then the 1st Army. First off it doesn't even move on the first turn, then most of its Corps trains have an incomplete-2 marker on them. This limits their range until you spend a turn reducing the marker, in all it takes two entire turns for the trains to loose these markers and be operating at full efficiency. The terrain in the 2nd Army's area is also very restrictive. There is a big gap between your units and the Germans. The terrain is either swampy or mixed (swamp/rough/woods). There is only one rail line that leads towards the Army's objective yet most of the Army starts 8-12 hexes away from this RR line. As I had done in prior games I moved the 2nd Army's minor Depot over to this line as soon as I could. I send two Corps (13 & 6) into the swamps in a direct line to the nearest Strategic Objective. The other two Corps (1 & 15) advanced along this rail line leading towards Tannenberg. 


Opening Salvo, 1st Division attacks a lone Brigade

It wasn't until the third turn that we saw our first Prepared Attack. This happened in the 2nd Army's area as the 13th Corps emerged from crossing the swamp to destroy a German brigade. When I made these attacks I was at the very limit of my supply line. Bob rushed the 20th Corps into the area quickly and launched his own attack against the 13th.  In the 1st Army sector, the 2nd and 4th Corps were starting to close in with the rest of the Army and I started to finally advance across the boarder into Prussia. Bob only had two Corps (1 & 17) in the area and slowly pulled back not wanting to give battle. 


Battle is Joined (turns 4 & 5)


The 2nd Army's 1st Corps is making good time advancing on Osterode. Bob nearest Corps is over facing my 13th and 6th Corps who have emerged from the swamps and engaged them. I am able to run up and attack a couple of Brigades in the rough terrain a couple hexes South of Osterode and push them back. The 6th Corps on the 2nd Army's right takes up the fight after the 13th is badly shaken by its attacks on the German 20th Corps (I failed my EL checks). In the center of 2nd Army's area the 15th (the pink guys) are making good progress to towards Allenstien (an objective of the 2nd Army). Bob trains in a Corps (1R) to this area from the 1st Army's front and suddenly I am uncomfortable about how exposed the 15th is. Its all in at this point and I should be able to make attacks on two of the three 2nd Army objective next turn. 


2nd Army, Combat phase turn 4


1st Army, end of turn 4

In the 1st Army's front Bob is digging in behind a river line a few hexes in front of Intersberg (the 1st Army's Objective). When he shifts the 1R Corps South to face the 2nd Army I am left with a 3-1 advantage in Corps. I have my Cavalry ranging North of the main line of advance pushing Bobs Cavalry back and trying to drive off an approaching Brigade marching down to reinforce his lines. I have a couple more Divisions arriving and marching to the front as well. I will have little choice but to launch frontal attacks on his dug in troops behind the river line, but that's ok as I have more troops and am hopping to grind him down. 

Start of turn 5

Turn 5 is very busy on both fronts. In the South, 2nd Army is attacking two of its three Strategic Objective. I only need to occupy one of these to meet my plan for the 2nd and score some nice VPs. More importantly this will lift the restriction on my movement. While an Army is under Strategic Objectives its combat units are restricted in their movement, if they move they must move AT LEAST ONE HEX closer the an Army objective. Thus once you get close to your objective you are really tied to them and lack any room to maneuver. Bob on the other hand is free to run around as he sees fit. 

2nd Army launches two 3-1 attacks on Objective hexes

1st Army starts to assault the trench line

Bobs reaction movement phase see's him detrain the 1R Corps and make a lunge at the 15th Corps 8th Division. I have left this unit back to cover the Corps train and I am glad I did and its looking like Bob is planning on going after it. My two attacks on the Strategic Objectives (Allenstien and Osterode) are stopped cold despite 3-1 odds. I merely needed to roll a six or less on 2d6 to have taken one of the two hexes. 

Bob quickly gets the 1R Corps into action on the flank of 15th Corps

Bob flanks and routes the 2nd Corps on the 1st Army's left
 On Bobs next turn he unloads a division near Osterode and pushes one of the 1st Corps Divisions back one hex. The 1R Corps attacks my 8th Division (15C) which is only two hexes away from its Corps train. The 8th holds thankfully with neither inflicting much damage.


The 1st Army's front is not without drama either. My attacks on Bobs two dug in Divisions don't do much except cost me men and EL level. Bob counters by sending his 1st Corps around my Southern line and attacking the 2nd Corps. This was a close one as Bob could have force marched after my Crops train but instead chose to attack the two Divisions. I would have gone after the train as that would have really caused me some problems that would likely have forced me to abandon my Strategic plan earlier that I would have wanted to. The attack goes well and I am forced to retreat two hexes taking some heavy losses in the process. My reaction movement allowed me to move the two trains in the area out of immediate danger though. My Calvary gets into some trouble on the right side of 1st Army's line and a couple of brigades have to high tail it out of there in a hurry as Bob's lone Brigade from the North lunges in. 


We stopped here for the day. Each of my Army's are either adjacent to or a couple hexes away from their objectives while at the same time facing threatening flanking movements. The next couple turns should be very exciting for both of us.

End of Turn 5

Sunday, February 19, 2012

1914 Twilight in the East (GMT) ~ 29.7 The Battle of Ivangorod

Game: 1914 Twilight in the East
Publisher: GMT Games
Scenario: "The Battle of Ivangorod"
Participants: Bob H, Myself
Time: Sun 2/19, 2.00PM - 4.00PM

1914 Twilight in the East is one of my favorite games. Bob pushed me to play it back in 2008 and it was an easy sell once I got it and looked it over. The game takes a previous WWI game system and improves on it. It's a Division level game covering the entire Eastern Front in the first few months of the Great War. Hexes are five miles and cover the length of the front from Eastern Prussia to Romania. The maps are fantastic, they are highly detailed and very pleasing on the eyes. The counters are equally pleasing and convey a large amount of information. Bob and I have played the Tannenberg scenario many times and the Galicia scenario once.

Recently the designer (Michael Resch) published a Journal which, among other things contained several new scenarios. Bob and I selected the tiny "Battle of Ivangorod" scenario to reacquaint ourselves with the game after more then a year away from it. The Journal can be had here directly from the designer. It's a full color professional product filled with some excellent analysis and history covering the period the game is involved in. This scenario is intended as a starter in that it is very light on some of the rules overhead the game contains, choosing to focus on the fighting around Ivangorod in October of 1914.


Starting positions
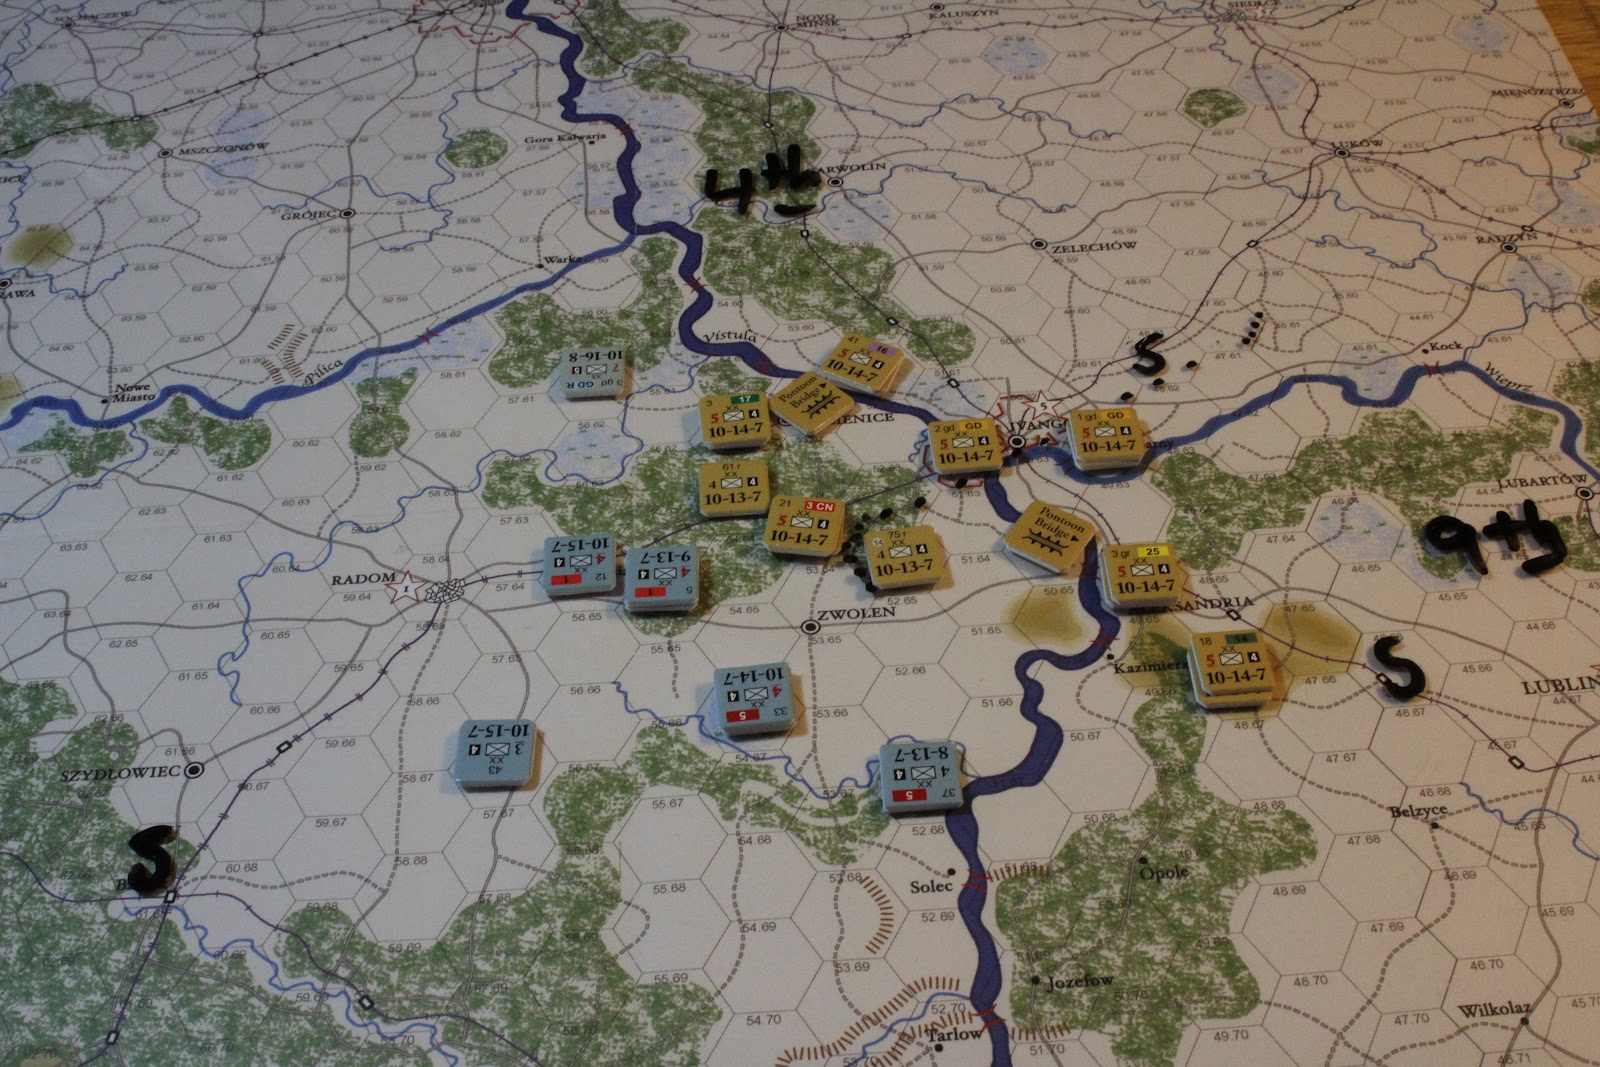
The scenario opens with the Austro-Hungarians assaulting the Russian bridgehead across the Vistula River near Ivangorod. The AH player is the attacker and has to push the Russians back. The victory conditions count the number of hexes on the West side of the River for victory subtracting the number of Prepared Attacks made by the AH player, the AH side needs to get the Russians down to six or less to get a win. As I mentioned the special rules eliminate several of the systems found in the normal game making it very easy for new or inexperienced players to get a grip on the basics of movement and combat. The AH have two strong Corps in play supported by one attached German Division. The Russians have components of two Army's on the map (4th and 9th) with a couple three Corps in each of these Armies). The Army boundary is right in the middle of the Russian position somewhat limiting what the Russian player can do as he has to keep units from each army on their side of the boundary. Bob naturally was the AH player, giving me the Russians. The scenario is only 1.5 turns long with the AH player going first, then the Russians and then one more AH half turn.
Bob makes his first turn Moves
The set up has the Russians a bit more spread out with some of the units back across the River. The scenario also takes place in the fall so we'll be using that CRT and associated terrain costs, in the Fall the CRT is harder on the attacker and movement is more costly then scenarios that take place in the Summer. Bob opens the game with two Prepared Attacks. A Prepared Attack costs the attacking player 3 movement points while giving the attacker a one column shirt on the CRT. Additionally units that are subject to a PA are unable to move during the counter movement phase. Perhaps its a good time to give an overview of the games mechanics.

End of AH Movement, 1st turn

End of Russian Counter-Movement phase, 1st turn
A normal half turn (normally the Russian player with go first, but not in thus scenario) will have the phasing player move first. Each unit may use its full allotment of MPs (normally 7) and has the option to force march to gain an additional 3MPs. During movement, the phasing player will place attack and prepared attack markers. Then the non-phasing player will conduct reaction movement. This allows him to move any of his units that he wishes half their movement allotment (usually 3.5MPs), force marching is also allowed for the reacting player. The reacting player can place attack markers also, but in not allowed to place prepared attacks in his reaction movement.

The phasing player then conducts all of his combats followed by the non-phasing player. Combat is a multi-step process. The attacker will determine the odds, there are various column shifts that can apply for both the attacker and defender then the dice are rolled. Once the result is determined you then determine losses with each player rolling on another chart to see have many (if any) steps were lost and to generate a modifier to use on the final step. Artillery weighs in on this step by adding a modifier to the die roll. The column you use to roll on is based on how big the battle is, there are 4 sizes from less than two divisions to massive 6+ division battles. Lastly each side will roll on the Effectiveness chart (or take a moral check if your an ASL player). This tests each one of your forces effectiveness (moral/organization) taking into account retreats and casualties. If you roll badly you might have to retreat suddenly after stopping the attack on the CRT. The game tracks each units effectiveness individually and continuous combat will eventually catch up to you.

Initial AH attacks, turn 1

After the Combat phase, turn 1
Bob opens by launching to Prepared Attacks on two of my lone divisions. He closes in with the rest of his units. During my reaction move I am able (via force marching) to reinforce the 61r division with the 21/3CN unit. I am unable to reinforce the other attack against the 75r. The attack against the 61r & 21/3CN goes very well despite it being a 2-1 when Bob rolls a 2 (2d6), I retreat two hexes, take two steps losses and each units losses a EL level. The battle is costly for Bob and he takes the same losses as I do (2 steps and -1EL). Bobs 2nd attack goes well (3-1 this time) sending the 75th back two hexes. The result of this has my 52'd Division out of supply at the start of my next turn. I should point out that we did not take 5 steps off of the 75th Division like we should have per the scenario instructions.

End of Russian Movement Phase, 2nd turn

End of AH Counter-Movement phase, 2nd turn
My movement phase sees me launch my own set of PA's (despite the advice given in the analysis of the scenario) as well as getting the remaining divisions on this side of the Vistula. Bob counters with an attack of his own while reinforcing (again via force march) one of my PA's. My attack in the South with the 25th Corps does nothing but cost my Corp an EL level and each of us a step lost. I do not push him out of the hex. The attack on the German 3gd is equally inconclusive with neither side causing or taking losses or EL. My last PA against his 1st Corps (12 & 46) again fails to dislodge him but I came out better inflicting two steps lost to my one with each of us loosing an EL. Bob's lone attack is a disaster. He has two divisions (14 & 33) from his 5th Corp attacking my 61 reserve division (2-1). He blows the EL check at the end and looses 2 EL and has to retreat one hex. This is a good example of why I like the combat system so much in this game as it models both the strength of the two sides but also thier effectiveness and you sometimes see some really interesting results come from a fairly normal 2-1 attack. My out of supply unit forces Bob to retreat out of the way, costing one of his units another hex that he'll have to make up in his upcoming turn.

Start of Last turn
Russian EL chart
At the start of Bob's next turn (and the scenario's last) we are sitting at a net of 10VPs. Thus Bob needs to take two hexes while making at least two PA's to get a win. I will have my counter movement phase and any attacks that I can put up to counter him with. For Bob there isn't much to do but send in the troops again, he makes two PA's, one against the OOS (52nd) division in the middle and the other against the shaken 25th Corps. During my counter move I launch two attacks while reinforcing the OOS division with a division from the 16th Corps.

End of AH movement, last turn

End of Russian counter-movement, last turn

Bob starts off with the attack against the 47th and 52nd (oos). This is a big 5-division battle, Bob has three attacking from two hexes (all from the same Corps) against my two. The odds are 1-1 and go to 2-1 for the PA. Bob rolls well on the attack and pushes me out of the hex. Losses are light (1 step ea) but when we roll for effectiveness Bob blows one of the rolls sending two of his divisions retreating back one hex with 2 EL lost. Thankfully his other division keeps its cool and is able to advance in and take the hex.

An Example of the Combat process
His second attack goes much better and pushes the 25th Corps back, forcing them to run back across the Vistula in the process. Thus he's taken his two hexes and launched two PA's, he'll win if he can survive my two (counter) attacks. The Germans again brush aside my assault by the 17th Corps with each side taking one step lost and no EL. My last attack pits the 14th Corps against a lone AH division. I fail to take the hex on the CRT and Bob finishes the game with another 2, this time on the EL check and his division stands giving him the win.

Final Positions, end of scenario
So this is a great little scenario for learning the game or getting used to it after some time away. We are next going to go back to our favorite scenario and play Tannenberg.

Sunday, February 12, 2012

Strafexpedition 1916 (Europa Simulazioni) ~ Scenario 1, "The Drive on Pasubio"

Game: Strafexpedition 1916
Publisher: Europa Simulazioni
Scenario: #1 "The drive on Pasubio"
Participants: Bob H, Myself
Time: Thu, Jan 19th 7.00PM - 9.30PM
         Thu, Feb 2nd 7.00PM - 9.00PM
         Sun, Feb 5th 3.00PM - 5.00PM

Were it not for Bob's eclectic taste in games I would never have even known about a game like Strafexpedition (SE). Bob has always had a thing for games on the Austo-Hungarian Empire (not that there are a lot of them), as well as for games covering WWI. Bob let me know that he'd received this game earlier in the year and said it was one that he's like to play. Since I could hardly refuse his request as he's ever willing to try out games that I'm interested in, I ordered the game from the publisher and did my bit to support the European wargame economy.

When game arrived a couple weeks later I dived into the rules. I was pretty impressed. The rules are well written and very accessible. The game covers the Spring Offensive the AH unleashed on the unsuspecting Italians in the Alps around Trentino. The Austrians were trying to cut off the larger Italian forces further east by attacking here. Most of the Italian Offensive operations were further East. The game comes with a couple page article on the actual operation which I found very valuable and well written. The designer also takes a page up talking about his design process and the history of the game, again I found this very interesting.

The games scale is 900 meters per hex with units being Battalions of Infantry and Batteries of Artillery. There are also leader counters that are used to activate a formation (usually Brigades) during the turn. There are also Fortress counters. There are two maps covering the area of operations. There are five scenarios starting with a very small introductory scenario with a couple of one map  scenarios and of course the campaign that features the entire operation (May-June, 1916).

Italians set up, AH stating to set up

As I mentioned the rules read very nicely and after reading them I was even more interested in trying out the game. Prior to our playing of this scenario we set up the small intro scenario and played through that one. A turn consists of getting reinforcements and supply, then allocating that supply to your leaders (Brigades) and then rolling for initiative. Each player rolls a die and adds in the number of supply points that he has allocated for the turn. Once the initiative is determined that player will then select from one of his supplied leaders and place that leader on the map, this allows him to activate units of that Brigade for movement and combat. The amount of supply allocated determines how much artillery that leader may use over the course of its activation.

Bobs initial attacks on my left on turn 1

After Combat

Combat is very straight forward and takes little time to resolve. The attacker opens with a bombardment, selecting various artillery units that are in range and that have not yet fired during the turn then rolls on the bombardment table. This table will cause units disorder, losses and can also destroy trenches. Once the bombardment is over the defender can then defensive fire with available adjacent units and artillery that has not yet defensive fired for the turn. Most Infantry units have a machine gun factor (the small number in the middle of the two other numbers) that he uses to resolve defensive fire, artillery can also help out on defense albeit at a fraction of its normal strength. After defensive fire is resolved the attacker then makes his assault on the hex with remaining units, with a limit of two units (or less depending on the terrain) per hex. You will often see the attacker assign more then two units to one attack so that he'll have a choice of which units to actually use in the assault as some of his attacking units will get shot up prior to the attack. It is this assault that can force a defender from the hex allowing the attacker to move in.

Bobs assigned supply to his leaders

Once that leader has moved/fought all of his units, the player with the initiative will then select another leader to activate until he's used all of his supplied leaders. The defender can attempt to preempt the attackers activations as well. In our game this rarely seemed like something to consider. The non-initiative player will then activate his supplied leaders. Once he's done the initiative player will move all the rest of his units (those that were not activated previously) followed by the non-initiative player. Supply is then checked and replacement steps are placed on the map.

I liked the rules and how interactive they were, I wasn't expecting something like this from a operational WWI game. We decided that Bob would be the AH player in our first 'real' playing of the game. In looking over the scenario we looked at the map and the starting locations and how many victory points Bob would need to get a win. It looked like a tough one as he's really got to make a lot of progress over the course of the five turns of the scenario.

The Drive on Pasubio

All of my Italians start entrenched (at least those on the front line) which is nice because there are some big holes in my line. I had little behind these front line units other then some militia battalions and these were of low quality and without machine guns. I had a decent amount of artillery but little supply available in the opening turns to make use of it other then for the occasional defensive fire support. I get reinforcements on on turn 2 as well as turn 4, additionally I start getting supply points beginning on the 2nd turn which I need to start to entrench as you cannot entrench unless you are assigned a supply point.

Bob during his 2nd turn


Italian 2nd Turn
 Bobs first turn was mixed, he had some good attacks and there were others where he wasn't able to take the hex. As this was our first real playing we really had no idea this early in the game to tell how one side was faring over the other. On my right where the terrain is the heaviest I had some key hexes hold out that created a bit of a traffic jam for Bob as some of his not alpine troops couldn't cross or pass certain rough hexes. On the left where the terrain is a little flatter I was getting smashed. My center which starts with the fewest units had some units cut off as well. I did little in my half of the first turn as most of my guys were roughed up or too far behind the line to lend assistance. Most of my artillery just sat there being unable to move or fire (lack of supply) offensively on the first turn.

Bob's AH attackers on turn 3 on my Right

Bob's attackers clear the road to Posina


I got reinforcements on the second turn as well as starting to receive supply points. I got about a brigade's worth of troops on my left. Bob was starting to get a little better at attacking on turn two. He was learning that fewer attacks with more artillery support was the preferred method. We also discovered another cool feature of the rules in how artillery can limit supply roads. This would prove an interesting mini game as I would often debate on leaving an artillery unit in a very dangerous position in order to cover Bobs supply roads knowing that I would likely loose the unit but I could often put a group of units out of supply by doing so. Another this we picked up on was that in order for an attack to keep going you will have to rotate units in the attack as attacking leads to much disruption and attacking with a disrupted unit is asking for trouble. The defender will also (when he can) want to send units a couple hexes back to try and reorganize before sending them back up into the line.

Bob's mounts as attack on my Right

...and is pushed back

Bobs attacks on my left continued but when my reinforcements showed up it started to look like he'd have a hard time taking the VP hexes in this area. In the middle Bob blew big holes in my lines but then ran out of supply as he was unable to supply his lead units, thus the attacks started to funnel down the roads on this side of the map. On my right Bob was starting to clear the initial line and make some progress. I had taken a lot of losses and he was able to make some nice progress. On my far right he was again slowed by poor performance on his attacks.

Turn 3, Bob moving...Yellow dice are the VP hexes

The road to Valmorbia...turn 4
 Turn 3 saw these deeper road based penetrations expand. Most of the last lingering units on the front line were now gone having either been eliminated or reduced by lack of supply. But the clock was ticking and Bob had only taken 3-5 VPs thus far.

By turn 4 we were seeing that Bob was behind the curve as it was looking like he would run out of time before he'd get the VPs he needed for a win. I also got the last of my reinforcements this time on the right, which was exactly where I needed them most. Bob got close to Posina here and this was where he would win it if he could be getting to the VP locations before I could with my reinforcements. Bob also lunged down the road towards Valmorbia on my left. I had only some militia here and quickly reinforced this area.

My Italian's counter Bob's move

As it was getting late we took a close look at the Victory situation at the end of the fourth turn and decided that it would be nearly impossible for Bob to get the needed VPs for a win. He was essentially playing for a draw at this point so we decided to call it a game at this point.

End of turn 4

All in all I was pretty impressed with the game, it was a lot more fun then I expected and was pretty interactive for a battalion level game. The one sided nature of the scenario however means that the defender has to basically get smashed for five turns in this scenario. The campaign game which is much larger will see the Italians have a chance for some counterattacking.