
Series: Great Campaigns of the American Civil War
Scenario: The Maryland Campaign, Scenario #7 [Updated via the Skirmisher #2 rules]
Participants: Jim "HeavyD" D, Myself
Time: Fri, 8/12 ~ 6.30PM - 10.00PM

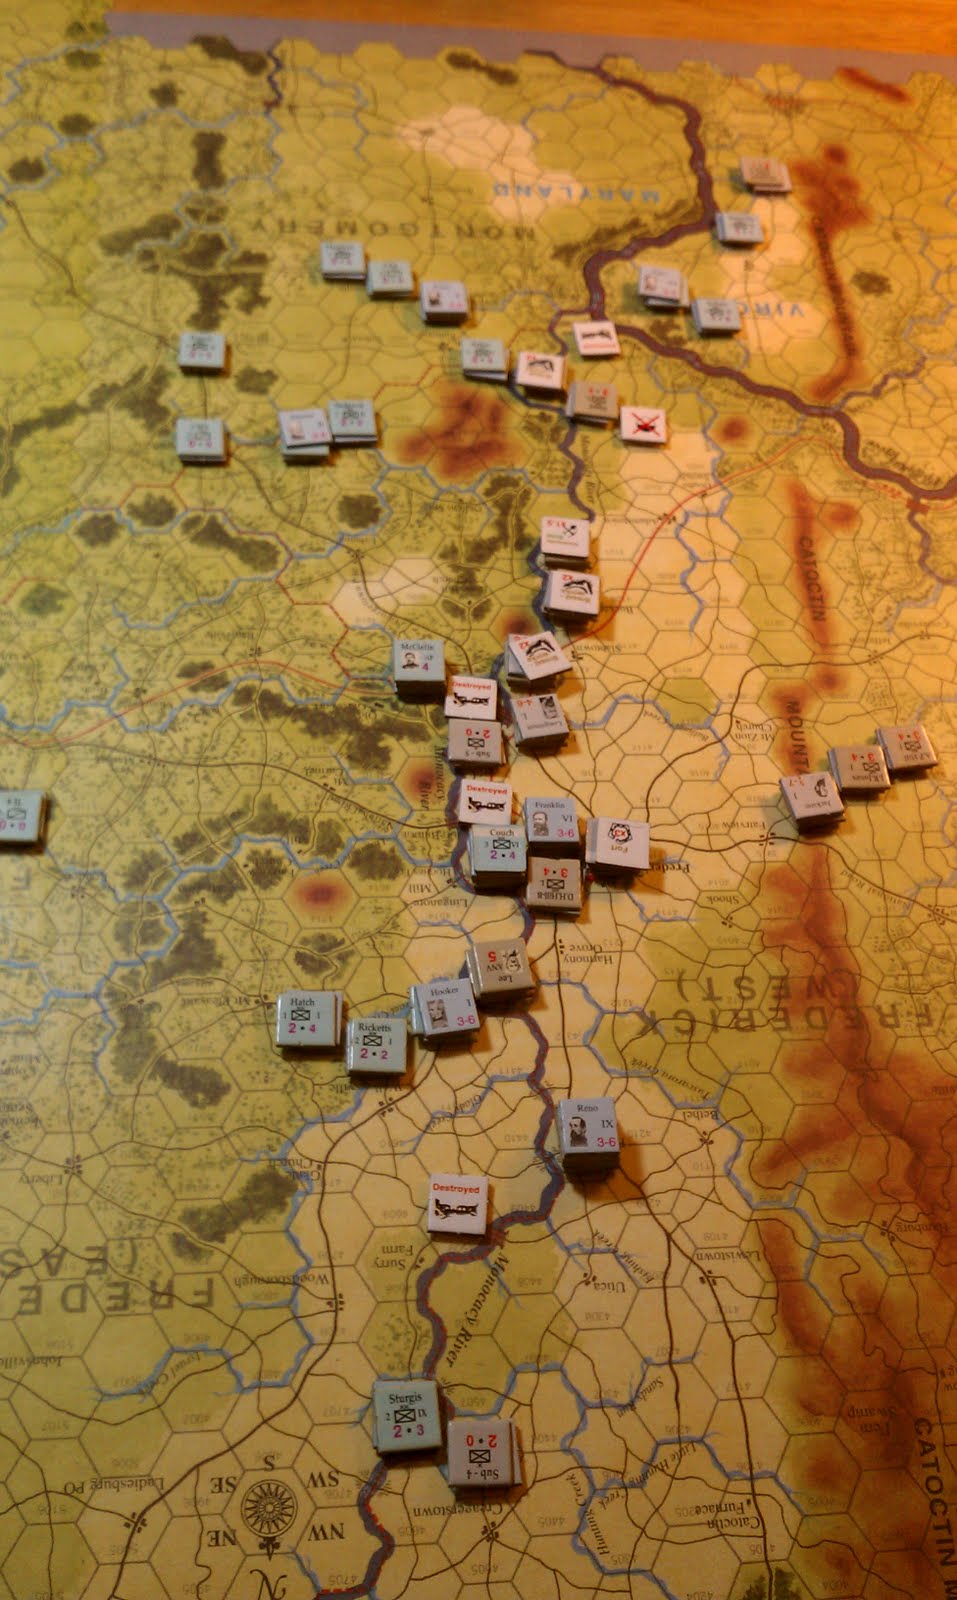
Turn 8 ended with the Army of the Potomac approaching the Monocacy River. I had sent two Corps North in the hopes of crossing further upstream, but HeavyD was able to stay in front of me the whole way. He would get the actions he needed early in the turns and was able to keep creating sub units and placing them in my path. The AoP is spread out in three groups. In the North I have Hooker's I Corps and Reno's IX Corps (seven Divisions) facing elements of Longstreet's Corps spread out along the Monocacy and fortified in Frederick sitting on a Union Depot. Supply will hit on the next turn so that Union Depot is important to both of us. In my Center I have Mansfield's XII Corps along with Franklin and VI Corps and Sumner's II Corps. Here HeavyD is spread thinner, with a mix of Longstreet's Infantry and Stuart's Cavalry entrenched behind the River. In the South I have Sigel's XI Corps on the river line with Porters V Corps closing fast.
 |
| The map at the start of Turn 9 |
Turn 9, Crossing the Monocacy
 |
| Reno crossing the Monocacy River North of Frederick |
Union Commitment opens the turn for the Random event (my 6th). I get the first action round and activate Reno's Corps. They roll very well for MP's and I have enough to get across. I can get a Division in clear terrain next to one of his divisions. The clear terrain is what I needed to make this a safe move as I have good artillery in these divisions and this is enough to keep HeavyD from making an attack before I can get more divisions across the river. Sturgis' Division goes further North to pin the Sub-4 unit down (5SP), making a flank attack be HeavyD unlikely. I then get the next activation and am able to bring the other two divisions from the IX Corps across and into Reno's hex. Now there is no way HeavyD is going to be able to get a good attack on me this turn.
 |
| Greene's ill fated crossing South of Frederick |
Next up I move Mansfield's XII towards the river. Green's division gets enough MPs to cross the river and then move a hex or two in. I elect to move him next to Stuarts dug in Cavalry Brigade in the hopes of doing a flank attack on the next activation should HeavyD decide to stay. This is a risky move because Greene is out there with his back to a couple of Longstreet's units only three hexes away. However I judge the risk worth it as if HeavyD decides to go after Greene he would uncover the river crossings in front of Hookers yet unmoved Corps. HeavyD gets the next initiative and decides to go after Greene. He rolls poorly for MPs though and can only get next to me. I then win the next initiative and am forced to try and fight my way out. I activate Greene and get a +2 attack on the Sub-5 unit and fail to dislodge him. HeavyD then attacks with the next action round (+3) and routes me (I rolled my 2nd 1 on the combat die while HeavyD rolls a 5 or 6). I take three SPs as losses and loose the rest of the division on the retreat for a total loss of 9 SPs. This is a tough loss, but one that I knew was possible and I deemed the risk worth it. Hooker and Franklin have a clear line across the river now.
 |
| Longstreet's destruction of Greene's Division |
HeavyD adjusts his line with the next couple of action rounds. I then activate Frankin's VI Corps and they roll a 6 for MPs. As the road is open to Frederick, I decide to make a lunge for it as I am thinking about the upcoming Supply phase and I want the Union Depot that is still in Frederick. HeavyD has a small detachment still in Frederick under a fort marker (2PS x3 for the fort). I get another action round and move the lead division next to Frederick while I bring up the next two adjacent to DH Hills Division. A surprising third straight action round affords me the opportunity to make a weal attack (+1) on the city. The rolls are roughly equal and I become disorganized and loose a couple more SPs while HeavyD maintains control of the hex. With this attack, the focus shifts South as HeavyD marches Jackson and two of his Divisions North to reinforce his breached river line.
 |
| Franklin's desperate attempt at taking Frederick |
I then send Sigel across the Monocacy South of the Potomac. When Jackson pulled out all that was left was Munford's Cavalry Brigade. HeavyD tries to slow me down here with a Cavalry retreat but I am easily across with an open road across the Potomac. Porter continues to close from the East. The turn comes to an end at this point and we then check Supply for all of our units. Nearly my entire Army is out of supply except for Porter's Corps as they were across the county line and thus in supply. While this is bad, my forage rolls the the counties that we are in are all 6's so I should easily be able to get back into supply with most of my units. HeavyD is in the same position with the exception of DH Hill and the detachment in and adjacent to Frederick. He will have to roll 4 or less adding fatigue to that in the upcoming recovery phase, a much harder thing then what I am facing.
 |
| Sigel's Crossing south of the Potomac |
Turn10, Battle at Frederick
 |
| Positions at the start of turn 10 |
Turn 10 opens with both Army's spread out along the Monocacy and out of Supply. I have forced him back off the River line near Frederick and in the south. I am down a Division but feel like I am starting the get the upper hand. HeavyD is still about 20VPs short of a marginal victory but with the SP losses that number is much closer. I have to break his lock on Frederick County and inflict some losses the offset those I have taken.
 |
| Slocum's Division defeats Longstreet's two Division attack out of Frederick |
HeavyD starts off by bringing Jackson and the rest of Longstreet's troops north of Frederick into and around the City. Hooker then follows and we have six Union Divisions next in three hexes next to Frederick. HeavyD takes two of Longstreet's divisions and attacks Slocum's disorganized division with a +3 attack. Slocum stands firm and sends Longstreet back into the city with a couple of losses (I roll very well and HeavyD doesn't for a change). I take the next activation to bring in the other two divisions from Franklin's Corps to reinforce Slocum. HeavyD looks at attacking Hooker's two divisions adjacent but decides against it given the beating that he just took at the hands of Slocum's tough division. I leave Hooker in place so as to get back into supply in the recovery phase (and to start digging entrenchments). The lone Sub unit North of Frederick heads for the hills, not wanting to get surrounded and eliminated by Reno. Reno elects to stay put as well to forage instead of running after the unit.
 |
| Porter's V Corps Routes McClaw's in the South |
 |
| The two Forces gather around Frederick |
 |
| Union force composition around Frederick |
We then spend a long recovery phase rolling for nearly all of our units to forage and get back into supply. HeavyD finds out the hard way that units at Fatigue 3 or more cannot forage. Nearly all of my divisions get back into supply. Perhaps half of HeavyD's units are either at F3 or more or fail their forage rolls. They then go disorganized at the end of the recovery phase.
At the end of Turn 9 I was down having lost Greene's division in a failed bid to get Stuart. By the end of turn 10 I can barely remember this as I have HeavyD on the run in the South and three fresh Corps ready to head up to Frederick and cause trouble for the rest of the Army of Northern Virginia. Victory Point-wise we are still very close. If I can stop his control of Frederick County in the next couple of turns and inflict more losses then I take I think I can get a win out of the situation. HeavyD will be forced to fight to maintain control of the county, if he runs now he has little hope of retaking a different county. His pipeline of VPs for county control will have dried up.
 |
| End of turn 10 in the South |
Tonight's session has really highlighted for me the brilliance of this design. Both of us, in these two turns experienced highs and lows, now we are left with making the tough operational decisions. Does HeavyD pull out of Frederick and try and fight me before I can bring my two wings together? Should he stay put and dig in? Part of the excitement for me here is not knowing what HeavyD is thinking. Thus I could be thinking he's going to be doing one thing while he is thinking on doing something completely different. This coupled with the random initiative rolls make for some of the most intense gaming I've ever experienced. This Campaign is also unusual in my experience because of the closeness of the two Armies. Many of the CG's I've played over the years have looked nothing like an actual ACW campaign in that the fighting is generally spread out, you nearly never see bunched up Armies like you saw in the real war. Here we have the potential for some really heavy fighting around Frederick that will decide the balance of the scenario.
 |
| End of turn 10 |
Part 1
http://yockbosboardgames.blogspot.com/2011/07/here-come-rebels-mmp-maryland-campaign.html
Part 2
http://yockbosboardgames.blogspot.com/2011/08/here-come-rebels-mmp-maryland-campaign.html
As someone who is not at all interested in ACW this is really grabbing my attention. Looks a great game! Glad to see you both are having fun
ReplyDeleteIan
Great writeup Steve!
ReplyDeleteIt was definitely a very exciting evening as you worked your way over the Monocacy.
Hello nice ppost
ReplyDeleteGrreat reading your blog post
ReplyDelete